Windows Shellcoding x86 – Hunting Kernel32.dll – Part 1
Posted on 18 Mar 2019 by Paranoid Ninja
Welcome to Hell on Earth
Yeah, you read it right. For a guy who has learnt Linux Shellcoding and starts working on windows, its gonna be a hell of a lot tougher than you would imagine. Windows kernel is totally different from that of Linux. That being said, Linux kernel is a lot easier to understand than that of Windows because its open source and has pretty less features as compared to that of Windows. Windows on the other hand has had major remakes over the past few years and due to this a lot has changed. We will be focusing purely on Windows 10 x86, however other older versions might not be that different. There are already tons of blogs on walking through the PEB LDR, but there isn’t one which provides full logic and behind the scenes why it is important . Most people just rant through windbg, and expect that you understand the backend very well. The main reason for me writing this blog was to go from C to ASM and understand how things work out in the backend when Shellcoding in ASM x86.
section .data:
Before we start dealing with the Shellcoding part, I would suggest having a strong hand in C to understand how memory works, coz everything we will be doing would be in-memory. Knowing the windows data-types like LPWSTR, LPSTR and others would be a boon since that will get you to understand that:
Standard C != Windows C programming
Next, the sole important things to know would be basic Assembly x86. ASM is by default the same either in Linux or Windows, except for the syscalls or API calls. So, knowing how registers work is primarily important.
Most importantly, its important to understand how to disassemble binaries. I primarily use x32dbg and windbgx86 for this. I would be using both of them for debugging, coz there are a few things which you can’t do in x32dbg, which would be doable in windbgx86 and vice versa. So, we would be switching through both of them.
section .text:
Before we get started with Shellcoding, its really important to understand how things work at a lower level. We will start with a very simple example of finding the current hostname of the system. Let’s take a look at the example below written using Windows API in C:
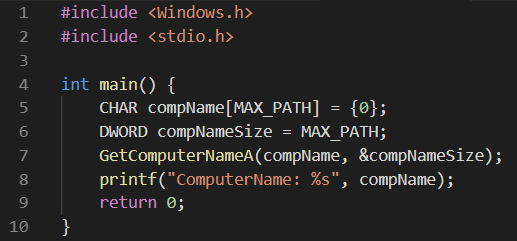
In the above image, I have created two variables compName and compNameSize. These will be the arguments provided to the function GetComputerNameA. Remember that there are two similar functions GetComputerNameA and GetComputerNameW. The W stands for Wide Unicode characters, whereas A stands for ANSI CHAR strings. We will be using the ANSI throughout the blog series. So, below is what MSDN has to say about the GetComputerNameA function:
BOOL GetComputerNameA(LPSTR lpBuffer, LPDWORD nSize);
The above code means that GetComputerNameA accepts an LPSTR meaning a Long Pointer String and LPDWORD meaning Long Pointer Double Word. A Word is 16 bit in size so DWORD is 32 bit across all platforms. Now if you compile the above program using g++, you will see something like this:

Now over here, at the very start of our program we have **#include
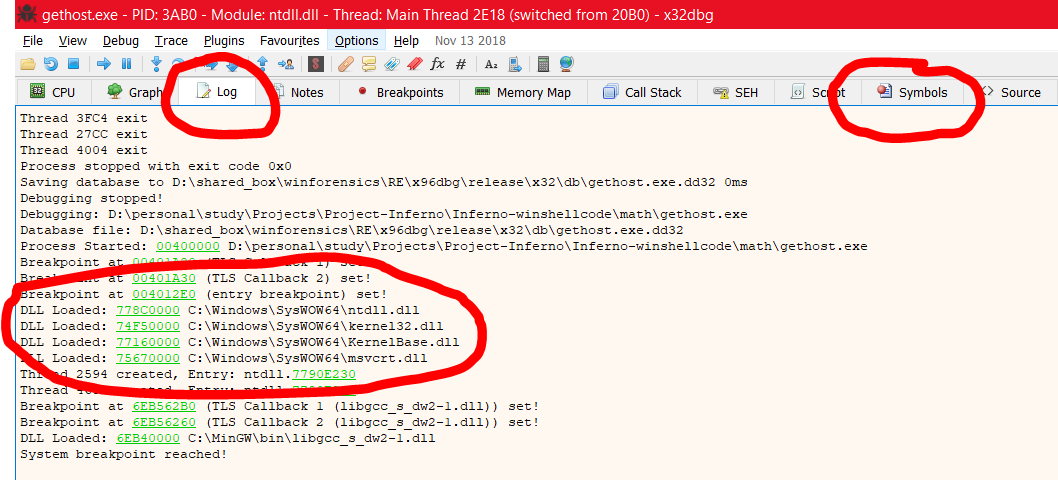
Next, we will navigate to the Symbols section highlighted above and we can see the name of the different DLLs loaded. Here we can walk through the DLLs and see which all functions do they offer.

Now if you search for the function GetComputerNameA in the search box, it will show that Kernel32.DLL loads the function. It will also print the address 0x74F69AC0 where the function is located. This is all good in theory and debugging, now let’s try to do this via C programming and then via ASM. Here are the steps we will need to do:
- Load the Kernel32.dll in memory with function LoadLibraryA WinAPI
- Find the address of the function GetComputerNameA within Kernel32.dll using GetProcAddress
- Typecast the GetProcAddress return value to a WINAPI function which accepts 2 arguments (since GetComputerNameA accepts 2 arguments)
- Create buffer for ComputerName and its Length
Execute the Address as a function pointer.
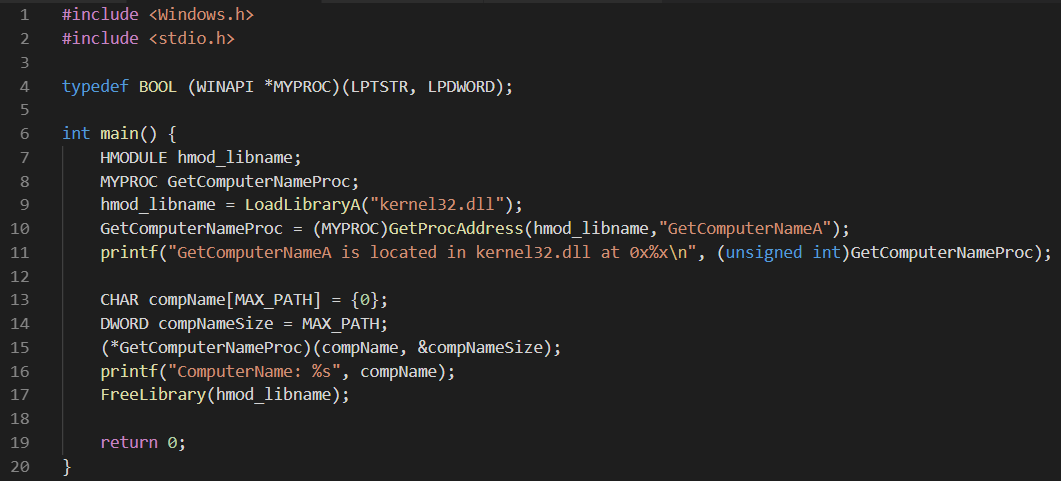
Visiting the MSDN page for LoadLibraryA, tells us that that it returns a HMODULE meaning that it returns a Handle to a module which is loaded. Thus, we created a variable hmod_libname. Similarly GetProcAddress returns an address for a function loaded from a DLL. And we need to typecast the address returned from GetProcAddress to GetComputerNameA function in order to make it work. Thus, we created a typedef which is basically a replica structure of the function GetComputerNameA. In the above image, I am loading the library Kernel32.dll and using GetProcAddress to find the base address of the function GetComputerNameA and storing the address in GetComputerNameProc. Finally we create two variables CompName and CompNameSize and execute the address stored in GetComputerNameProc as a function pointer using (*GetComputerNameProc) and supplying it the required variables. The above code also prints the address of the function GetComputerNameA. Let’s compile this and see how it looks:

Great! The address 0x74F69AC0 is the same as we found when debugging with x32dbg above.
_start:
Awesome. Now starts the fun part. Addresses of all DLLs and its functions change upon reboots and is different across every other system. This is the reason why we can’t hardcode any addresses within our ASM code. However, the main question remains. How do we find the address of kernel32.dll itself?
Remember when I said in the beginning that Kernel32.dll, NTDLL.DLL and Kernelbase.dll is loaded in every exe? Yes! The truth is that these DLLs are a pretty important part of the Operating system and these are loaded every time anything is executed. Thus, the loading order of these DLLs into memory is always going to be the same. This may however differ from OS to OS meaning it may be different in XP and may be different in Windows 10, but the loading order will stay the same across all Windows 10 versions.
So here is short version of what we need to do before moving forward:
- Find the loading order of Kernel32.dll
- Find the address of Kernel32.dll
- Find the address of GetComputerNameA
- Load the Arguments of GetComputerNameA on stack
- Call the GetComputerNameA function pointer
Sounds easy? Let’s proceed forward.
Finding the address of kernel32.dll isn’t straightforward. Whenever we execute any exe, the first thing that is created within the OS is TEB (Thread Environment Block) and PEB (Process Environment Block).
Our main interest here is in PEB struct (known as LDR) since this is where all the information related to a process gets loaded. Everything from process arguments to process ID gets stored in here. Within PEB, there is a struct called as PEB_LDR_DATA which contains three important things. These are called Linked Lists.
- InLoadOrderModuleList – The order in which the modules(exes or dlls) get loaded
- InMemoryOrderModuleList – The order in which the modules(exes or dlls) get stored in memory
- InInitializationOrderModuleList – The order in which the modules(exes or dlls) get initialized within the process environment block.
The orders as to how the modules get loaded in the linked lists are fixed. This means if we could find the order of kernel32.dll within the above lists, we can search for the address of the kernel32.dll and the proceed further. Let’s start up windbg x32 now. Once you’ve installed windbg, open any exe as we did previously.
Once you load an exe within windbg, it will show you some output. As for now we will ignore the output and type .cls in the command prompt below to clear the screen and start afresh. Now, type !peb within the command prompt and see what we get here:
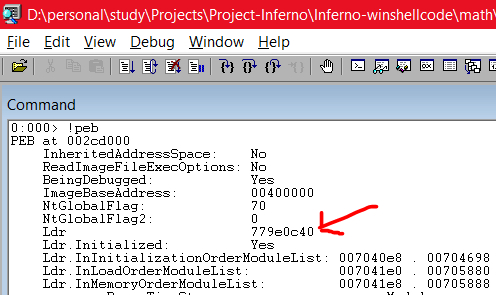
As you can see above, we get the address of the LDR (PEB struct) which is 779E0C40. This is pretty important since we will be using this address to calculate the address proceeding forward. Next, we type the command dt nt!_TEB to find the offset of the PEB struct.
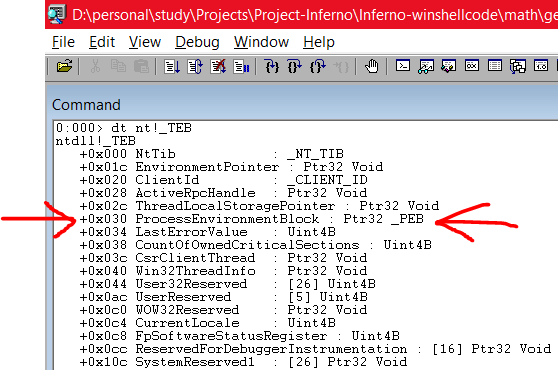
As you can see, the _PEB is at offset 0x030. In a similar fashion, we can see the contents of the _PEB struct using dt nt!_PEB

The offset of _PEB_LDR_DATA is 0x00c. Next, we try to find what is inside the _PEB_LDR_DATA struct. We can do this in a similar manner:
dt nt!_PEB_LDR_DATA
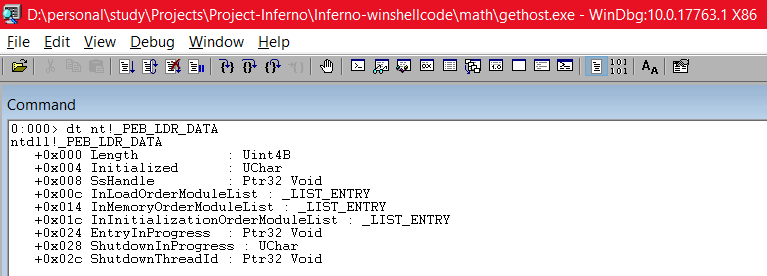
Here, we can see that InLoadOrderModuleList is at offset 0x00c, InMemoryOrderModuleList is at offset 0x014 and InInitializationOrderModuleList is at offset 0x01c. Also, if you want to see the addresses of where each of these Lists are located, you can use the address 779E0C40 which we found above (address of LDR) along with the command like this: dt nt!_PEB_LDR_DATA 779E0C40. This will show us the respective starting address and the ending addresses of the Linked Lists as below:
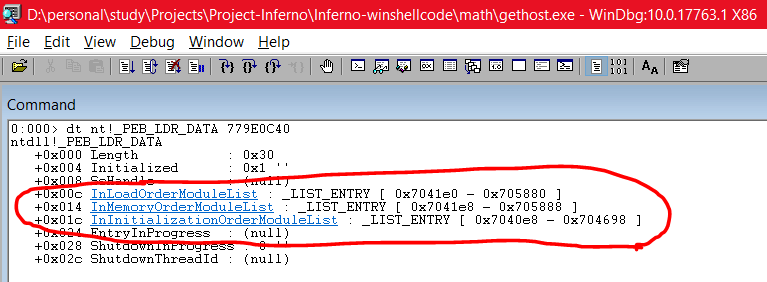
One thing that most people get mistaken is that the above image shows that InMemoryOrderModuleList is of type _LIST_ENTRY, but MSDN states otherwise:

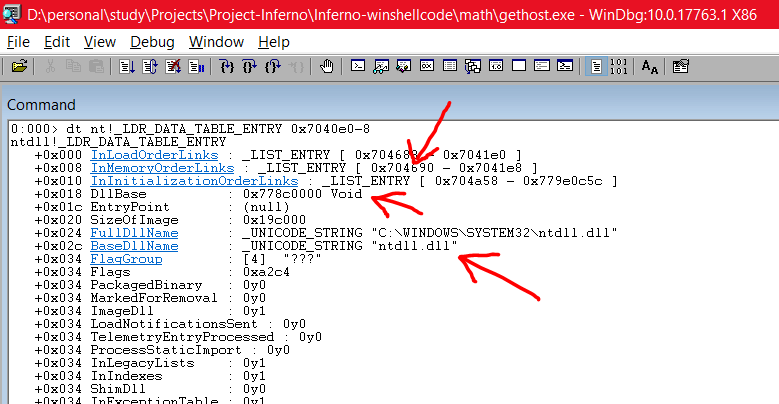
So, MSDN states that it’s an LDR_DATA_TABLE_ENTRY type and not _LIST_ENTRY type. Let’s try to view the modules loaded in the struct and we will also specify the starting address of this structure 0x7041e8 so that we can see the base addresses of the modules loaded. Remember that 0x7041e8 is the address of this struct, so the first entry would be 8 bytes less from this address. Thus, our command would be:
dt nt!_LDR_DATA_TABLE_ENTRY 0x7041e8-8
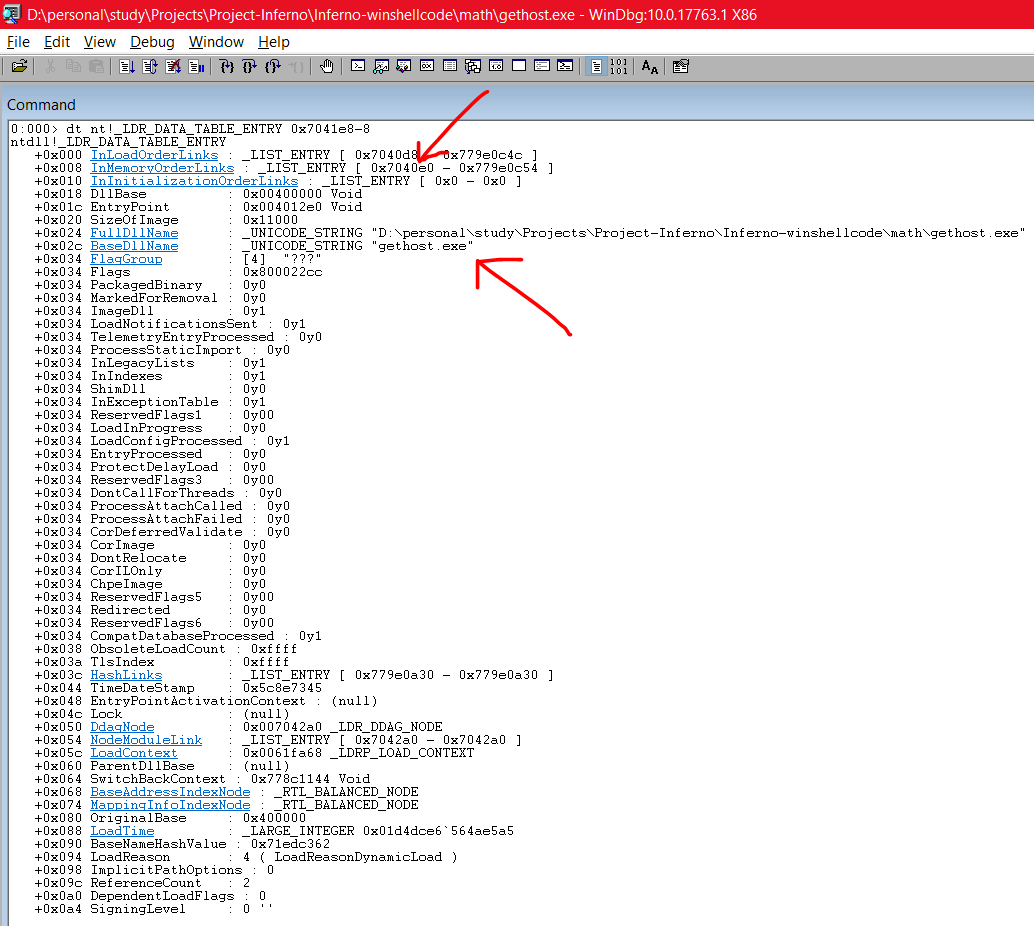
As you can see, the first BaseDllName is gethost.exe. That’s the exe which I executed. Also, you can see the address of InMemoryOrderLinks is now 0x7040e0. The DllBase at offset 0x018 contains the base address of the BaseDllName. Now, our next module loaded must be 8 bytes away from 0x7040e0 which is 0x7040e0-8
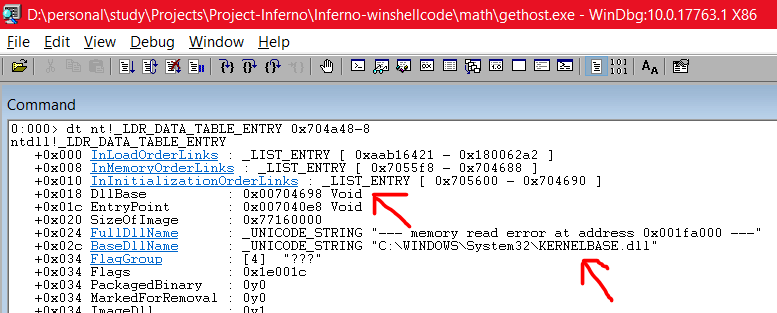
dt nt!_LDR_DATA_TABLE_ENTRY 0x7040e0-8
Great! So, our second module is ntdll.dll, its address is 0x778c000 and the next module is located 8 bytes after 0x704690. So, our next command is:
dt nt!_LDR_DATA_TABLE_ENTRY 0x704690-8
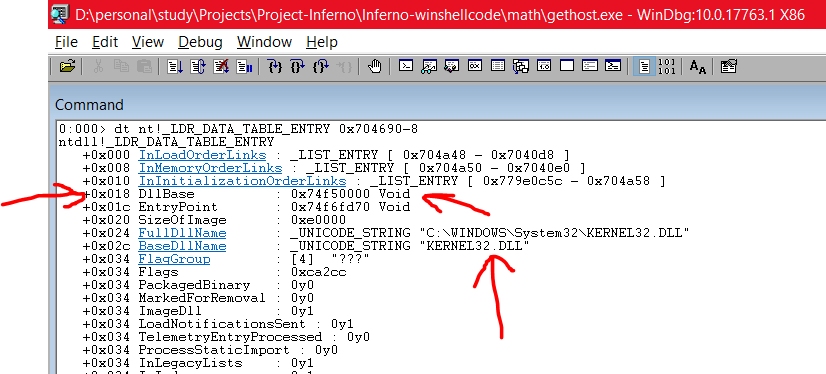
Awesome! So our third module is Kernel32.dll, its address is 0x74f50000 and its offset is 0x018. This order of the module loading is always going to be fixed, atleast for Windows 10,7 and 8 and 8.1. So, when we are writing ASM, we can walk through this whole PEB LDR struct thing and find the address of Kernel32.dll and load it within our shellcode. In a similar manner, you can also find the address of Kernelbase.dll which is the fourth module.
Great. Now let’s summarize our actions here as to what we need to do:
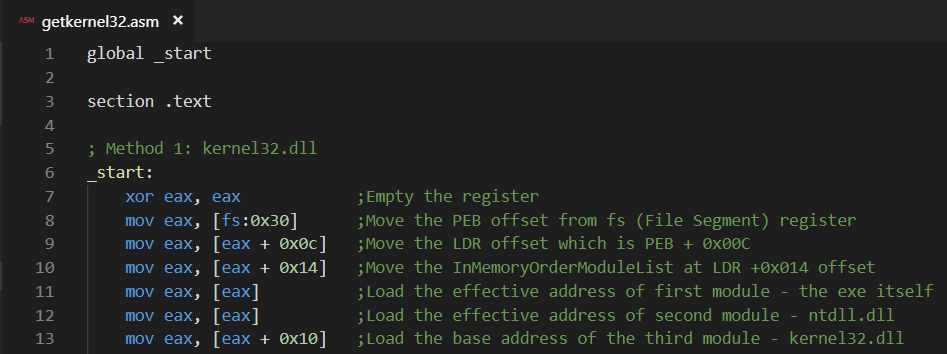
- PEB is located at offset 0x030 from the main the File Segment register
- LDR is located at offset PEB + 0x00C
- InMemoryOrderModuleList is located at offset LDR + 0x014
- First module Entry is the exe itself
- Second module Entry is ntdll.dll
- Third module Entry is kernel32.dll
- Fourth module Entry is Kernelbase.dll
Our main area of interest for now is which is Kernel32.dll. Every time you load a DLL, the address gets stored at the offset of DllBase which is 0x018. Our Start address of Linked Lists will be stored in the offset of InMemoryOrderLinks which is 0x008. Thus the offset difference would be DllBase – InMemoryOrderLinks = 0x018 – 0x008 = 0x10. Hence, the offset of Kernel32.dll would be LDR + 0x10 A detailed understanding can be found in the image below which I stole from here.

Now, if we do the same thing in ASM, it would go like this:
Let’s compile this with NASM as follows and load it up in x32dbg. You can download NASM from here.

Effectively, once our last instruction is run, it should load up the address of Kernel32.dll in the EAX register. and you can check the same in x32dbg as well as in windbg using the lm command: 74F50000 which is the address of Kernel32.dll.
Now that we have the address of kernel32.dll, the next step is to find the address of GetComputerNameA using LoadLibraryA and call the function. Unfortunately, this blog has grown too big and I will have to continue this in my next post. In the next post, we will be completing our full ASM code for fetching the computer name and printing it on screen and then the shellcode part.
Tagged with: shellcoding blogs