Shuriken – Android Kernel on Steroids
Posted on 26 Dec 2018 by Paranoid Ninja
Shuriken is an Android kernel for Oneplus 5/5T which supports multiple features for pentesting. It was specifically built for HackRF and Proxmark 3, but later I decided to add other features too. You can download the latest kernel source of Shuriken from here. If you want a prebuilt Zip file to flash it to your Oneplus 5T, you can download the raw zImage files and flashable zip from the release section.
The Origins
Few months ago, I received a project in my office wherein I was required to perform a physical breach assessment of an organization. Thus, I bought the infamous Proxmark3 RDV 4.0 and Chameleon RevE. For those of you who don’t know, Proxmark 3 is a device which can emulate and clone RFID cards of 125 KHz and 13.56 MHz, and Chameleon can emulate MIFARE cards. I will have a separate blog post on these devices later on. One thing I realized after the purchase was that Proxmark 3 wasn’t really that portable. If I wanted portability, then I would have to use a battery with it in order for it to work, that too in standalone mode. Also, there is a project named Walrus which is aimed towards making Proxmark work on android, but it doesn’t support the RDV4.0. It only supports the older RDV2.0. And that too it supports either High Frequency or Low Frequency in standalone and not both.
Thus, I decided to build my own Chroot environment in android wherein I can use both HF and the LF band. I didn’t want Nethunter since I find that to be too buggy. I didn’t want a Raspberry PI, since that’s too bulky. I wanted my own proper chroot (non-kali), maybe something Debian based which would support this, and I had a Oneplus 5T – one of the most flexible phones in market for testing. But in order for that to work, I would have to develop my own kernel which would support the proxmark driver and will recognize it using USB OTG. The project for which I was doing all this never came to life, but it did lead me to build this awesome kernel which supports every feature that the Nethunter does (Except the UI part 😉).
By default, the android kernel does not support extended features of the Linux Kernel. In order for my Proxmark to work, I needed to add the feature CDC_ACM which would detect my USB OTG device as a USB Modem and initialize the device at /dev/ttyACM0. Primarily this was the aim, but over time, I decided to add all the features of Nethunter to my kernel so that in case I needed any new feature, I can just plug-in my device to OP5T and it would simply work. Currently the Kernel Supports the following features:
- External WiFi USB Adapter
- HID Emulation
- CDC_ACM -> Proxmark/Chameleon Detection (all versions)
- Dynamic Module loading
- All other usual features of the Linux
I decided to write this blog, coz I realized the pain I had to go through to make this work. And since there aren’t many blogs which explain this, I decided to write one for my beloved infosec community. This blog is dedicated towards trying to make people understand how to add any feature you require to the android kernel. So, lets get started with the preliminaries.
Walkthrough
First things first, let’s download our ARM toolchain. There are multiple different types of ARM toolchains out on the internet. This is one of the most important aspect, since using an incorrect toolchain can mess up your compilation. As for me, I will download the google’s official toolchain. You can download the toolchain from here. Make sure you download the latest toolchain from here depending on the kernel version you are planning to modify. Once downloaded, we will add the following lines to our .bashrc file on our Linux distro to add our toolchain to the environment variable path.
export CROSS_COMPILE=/opt/aarch64-linux-android-4.9/bin/aarch64-linux-android-
export ARCH=arm64
export SUBARCH=arm64
Remember, that the above path is where I extracted my tool chain zip file. If you have extracted it to a different location, then use that path instead of /opt/. Next thing is to download a few dependencies for the kernel compilation:
apt-get install build-essential kernel-package libncurses5-dev bzip2 libelf-dev linux-source gcc-arm-linux-gnueabi lib32ncurses5 lib32stdc++6
Once downloaded, we will download the official kernel of Oneplus which was open sourced by them. You can download the kernel from here. Remember that the downloaded repo is not by default the latest commit. For Android 9 (Pie), you would need to checkout the QC8998_P_9.0_Beta branch. We can do the above in the following manner.
git clone -b oneplus/QC8998_P_9.0_Beta --single-branch https://github.com/OnePlusOSS/android_kernel_oneplus_msm8998
Once done, we are set to modify our kernel now. We will now proceed to modify the defconfig for our kernel. Remember that our OP5T has an ARM64 processor. If you navigate to arch/arm64/configs, you will see multiple configuration files for the kernel. The one we are interested in is the msmcortex-perf_defconfig. If you are trying to build the kernel for some other device, then you would need to find the codename and github repo for your device and CPU too. As for me, I will proceed with the Oneplus 5/5T. Once ready, we will use the below commands to build our custom configuration file out of the msmcortex-perf_defconfig
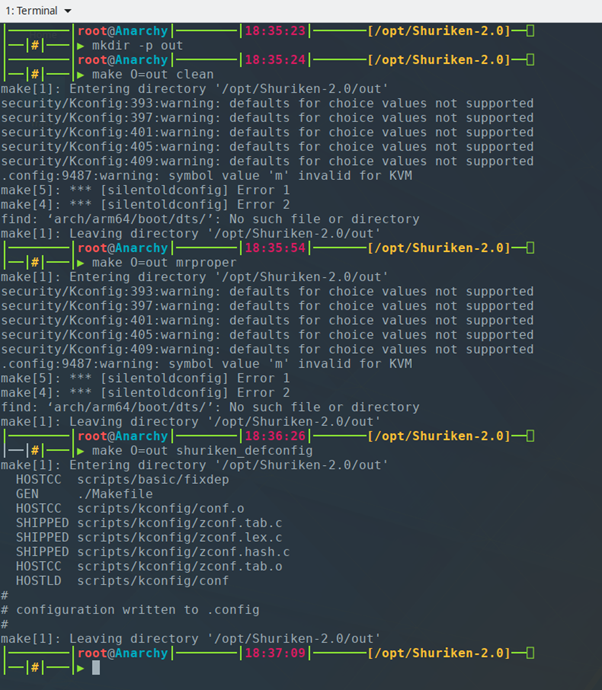
Above, you see that I have used the shuriken_defconfig file from my Shuriken repo. If you are using the original kernel of Oneplus repo, you need to use msmcortex-perf_defconfig. Now let me explain the above stuff quickly.
Here I am writing all the build contents to the out directory here.
mkdir -p out
Now, I am cleaning up the repo to remove any previous unclean build that was done
make O=out clean
make O=out mrproper
And finally, I am getting my config file ready for the build.
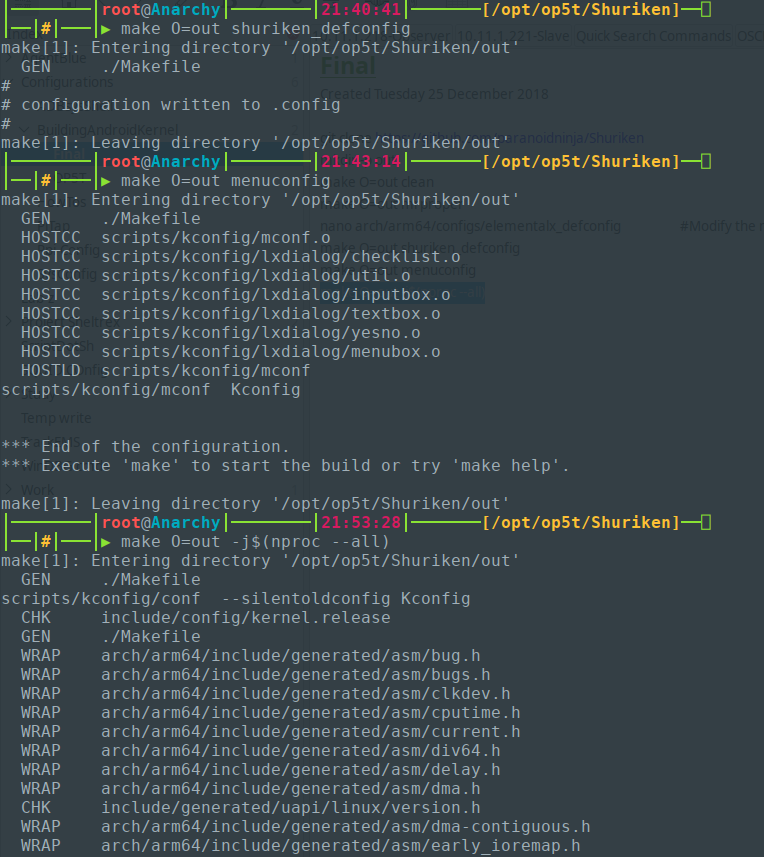
make O=out shuriken_defconfig
Now before we proceed, let me tell you a few hiccups where I spent most of my time banging my head on the wall. By default, the official Oneplus Repo does not ship any Wireless driver. So, if you are going to compile the stock kernel and think it would work, it won’t. So, in order for our WiFi to work, we would need to add a patch from another repo. You can either use a patch from Lineage OS or any other place. As for me, I will be using the patch from ElementalX by flar2 which was a big inspiration to me to build this kernel. Once you have found out your patch, you can either apply it directly, or do a remote fetch and then cherry-pick your patch from the git. Since we are already using an updated kernel from Oneplus itself, we will be using a hot patch i.e. by just downloading the patch file and applying it in the below manner. Also, we will be applying a patch of Airmon-ng to the Kernel so that it supports injection too.
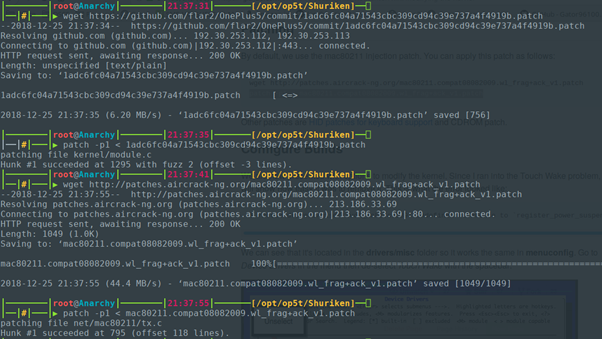
Download WiFi Patch and apply it.
wget https://github.com/flar2/OnePlus5/commit/1adc6fc04a71543cbc309cd94c39e737a4f4919b.patch
patch -p1 < 1adc6fc04a71543cbc309cd94c39e737a4f4919b.patch
Download the Aircrack Patch and apply it.
wget http://patches.aircrack-ng.org/mac80211.compat08082009.wl_frag+ack_v1.patch
patch -p1 < mac80211.compat08082009.wl_frag+ack_v1.patch
Similarly, you can also download and apply the patches for HID from here. Once you are ready with all the patches you need, next thing is to build your menuconfig and select the modules which need to be loaded for the patches we applied. You can run the below command for the same:
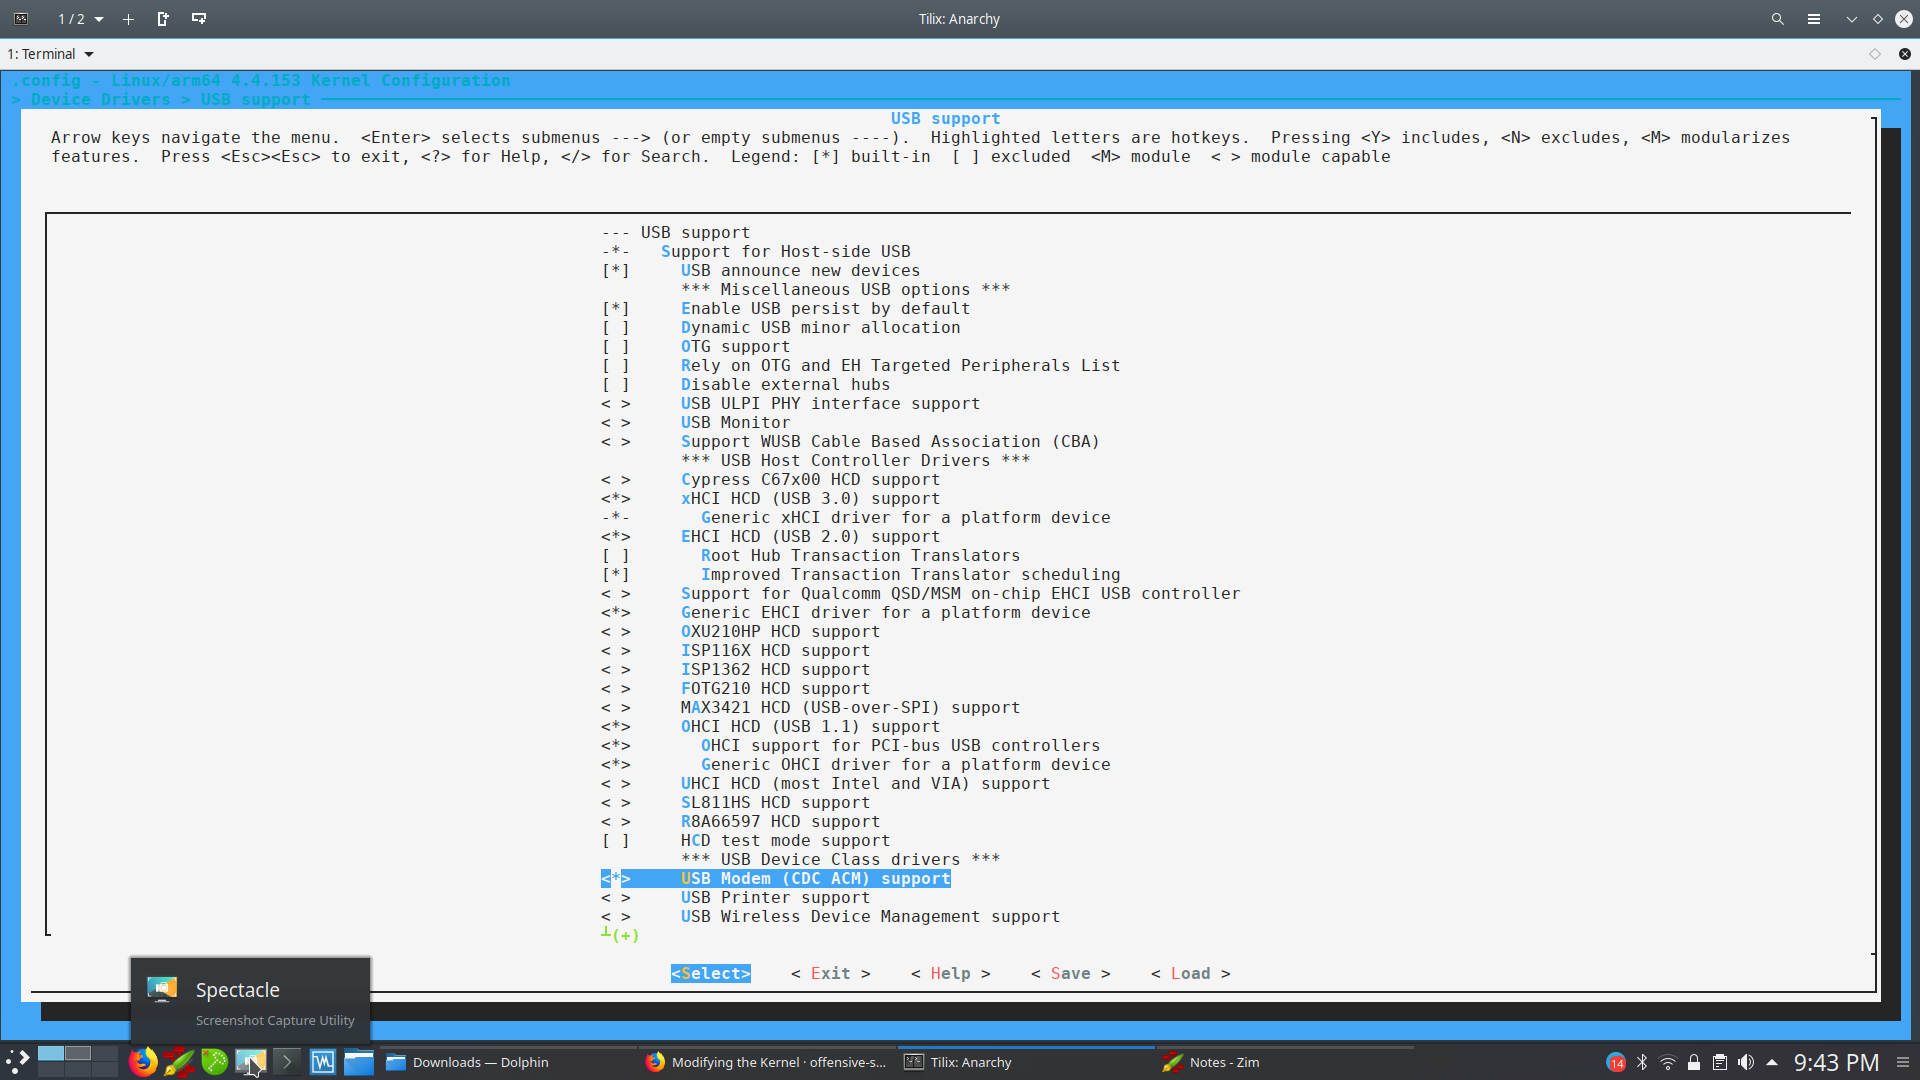
make O=out menuconfig
Once the above command is executed, we will be presented with a Blue Screen where we can select our modules. You can navigate the screen using up/down arrow keys and select with the spacebar. One thing to remember here is that when you press spacebar on a selected item, it will either show you [M] or [*]. M means the module is not loaded on boot, but can be loaded later on using modprobe/insmod. * means that module is loaded on boot. Remember that loading too many modules on boot can slow down and eat up a lot of battery life. For me, I do have a good battery life and thus I will be selecting the *.
First we need is the CDC_ACM Module which can be found as follows:
Device Drivers -> USB Support -> USB Modem (CDC ACM) Support
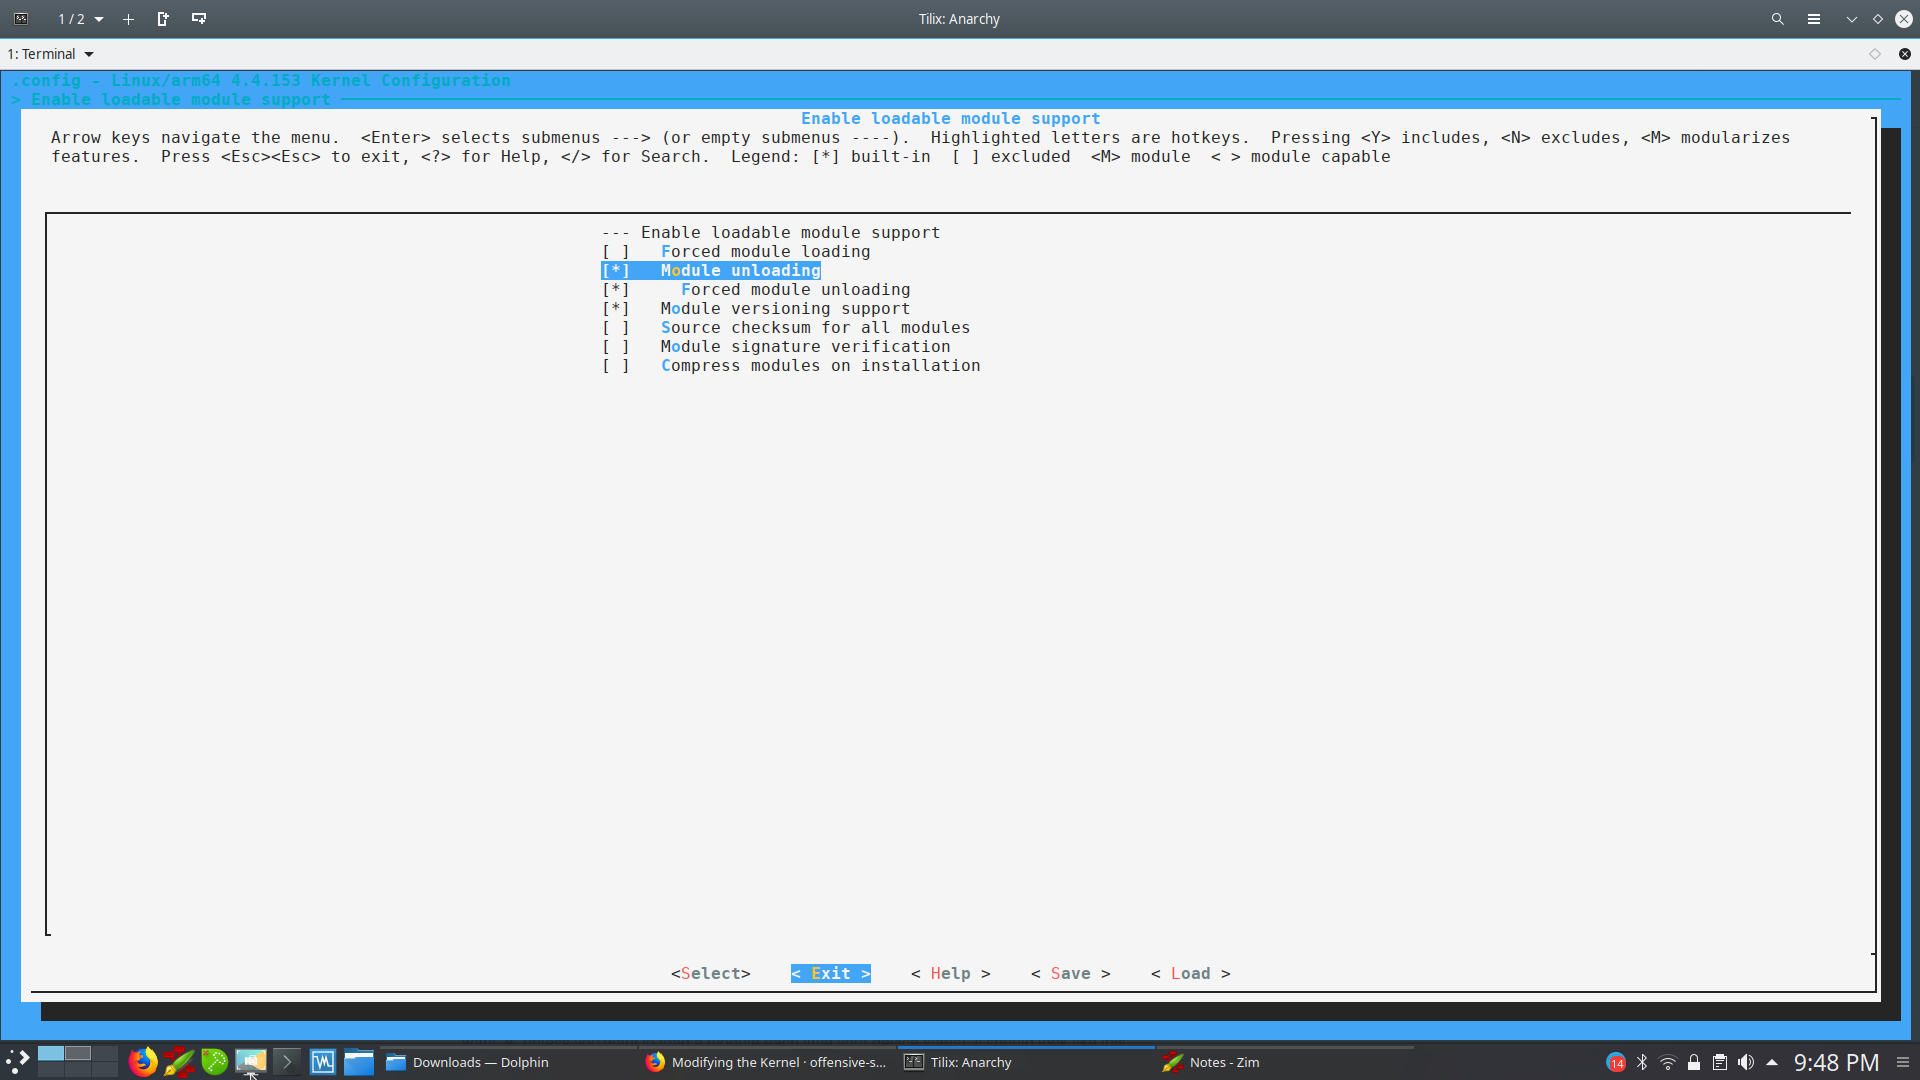
Next, we will enable dynamic module loading in case we require to load any modules which are not installed right now:
Main Screen -> Enable loadable Module support -> Module unloading/Forced module loading (Select both)
Next, we will enable support for external network adapters:
Networking Support -> Wireless -> Generic IEEE 802.11 Networking Stack (mac80211)
AND
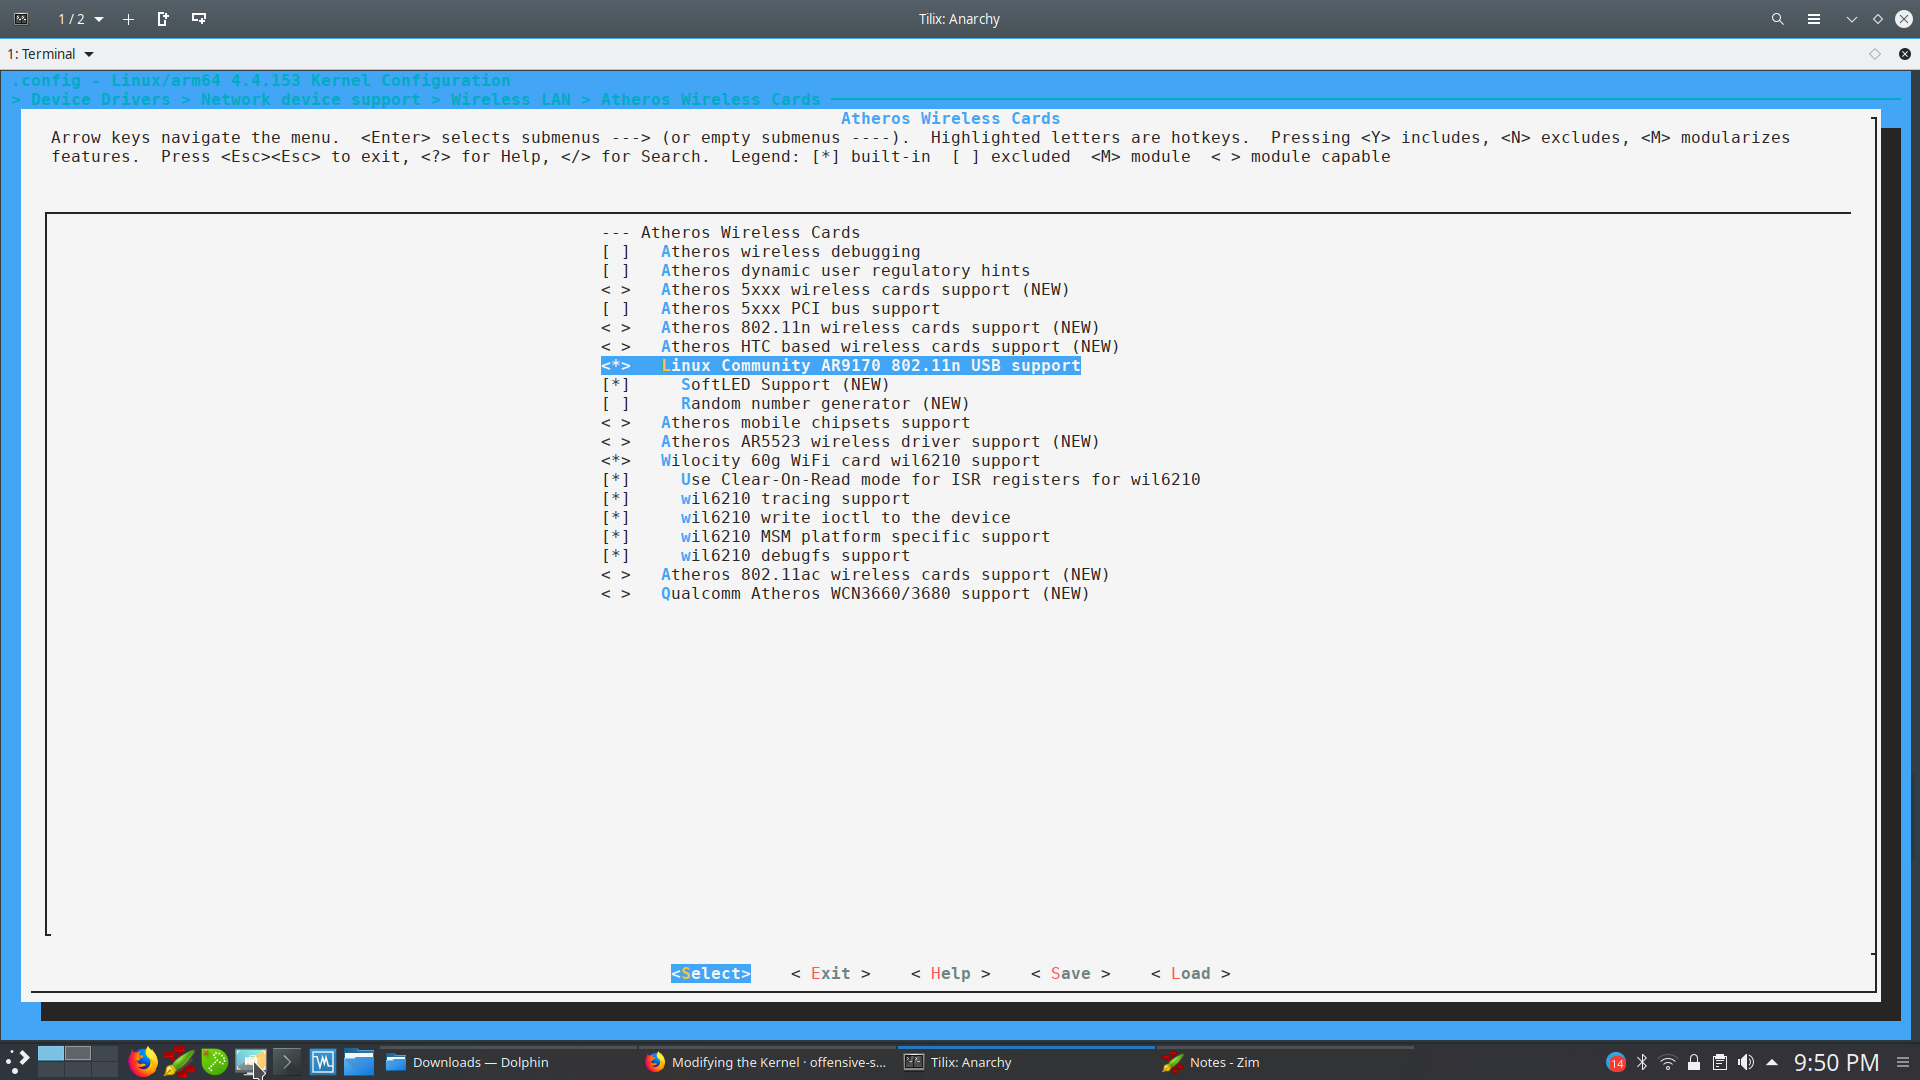
Device Drivers -> Network Device Support -> Wireless LAN -> Linux Community USB Support

And finally the USB Ethernet Support:
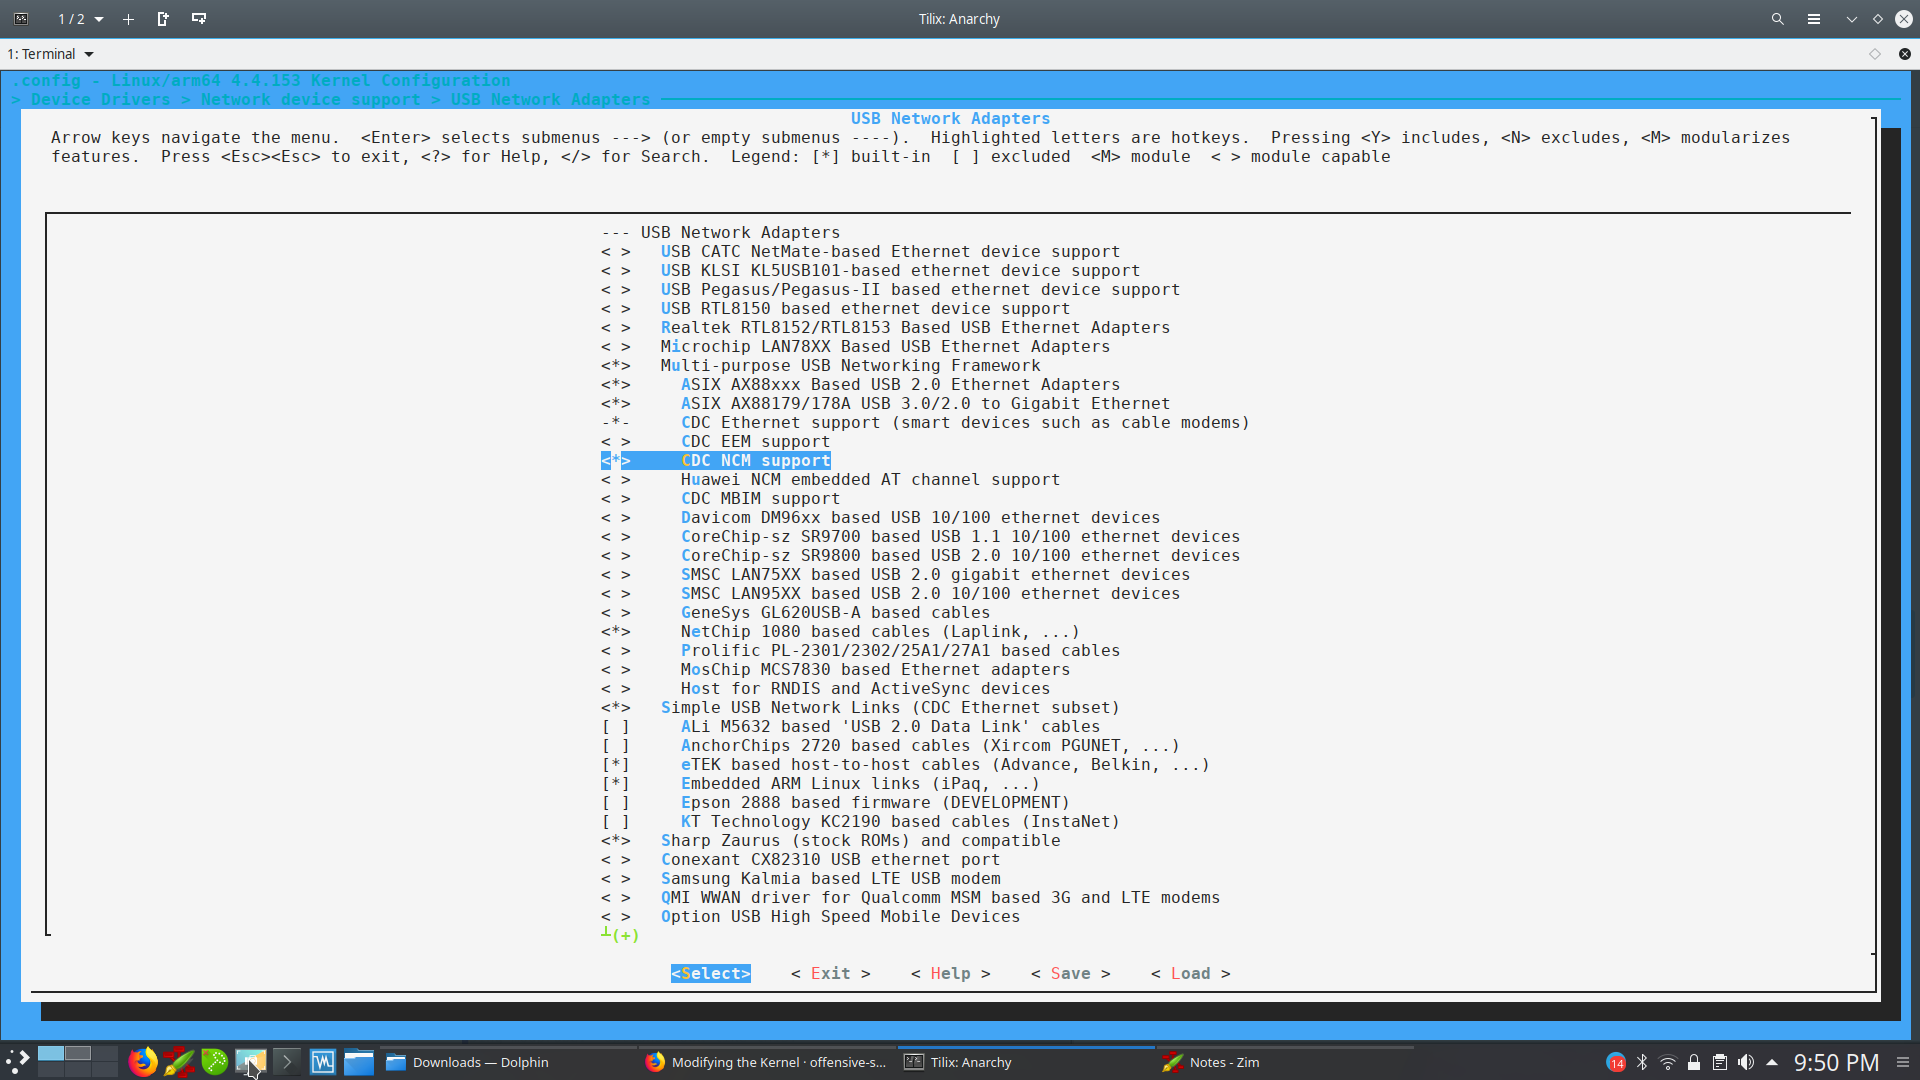
Device Drivers -> Network Device Support -> USB Network Adapters -> CDC NCM Support
Now, just Save the configuration using the arrow keys and exit. Once done, now its time to compile our kernel. Remember that it can take from 5 minutes to 30 minutes or more to compile the kernel depending on the speed and core of your CPU. My 8 Core CPU takes around 5-6 minutes to compile the whole thing. The below command proc -all uses all the available cores and similar number of threads will be started to compile the kernel. If you have lesser cores, it better to user -j2 instead of -j$(nproc –all)
make O=out -jn$(proc --all)
The Aftermath
Once the kernel is compiled it should look like this:
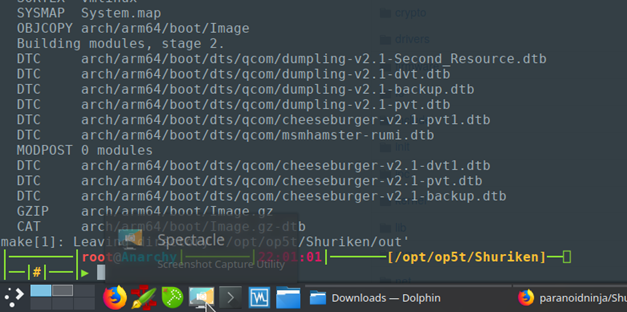
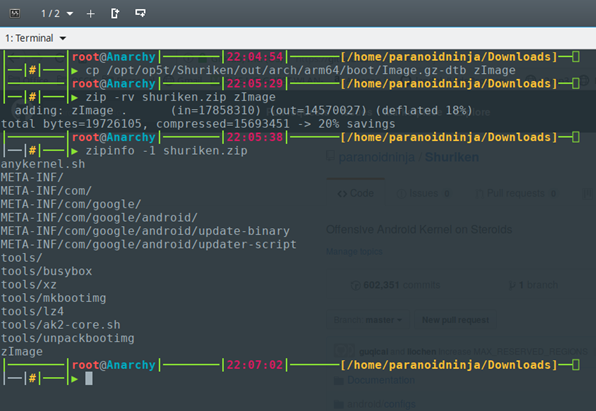
Now if you see somthing like the above image or if you have successfully compiled the kernel, then you will see that Image.gz-dtb file created in out/arch/arm64/boot/. There will be 3 raw Image files. The one we are interested in is the Image.gz-dtb file. We will be using this file along with the anykernel2.zip file to create a flashable. For Oneplus 5/5T, you can find the container zip file from the releases section here. Once, you have the shuriken.zip from from the above link, use the below command to copy Image.gz-dtb to zImage and the push it to the zip file without extracting. Remember, we DO NOT extract the file. This can cause issue while flashing. Just push it to the zip as follows:
Once the file is zipped, copy it to you TWRP recovery and flash it like anything else. If you have a Oneplus 5 or the 5T, you can simply download the release file and flash it. Its an up-to-date flashable with Openbeta32. This is how it would look like once flashed.
