Ground Zero: Part 2-2 – Reverse Engineering – XOR encryption – Windows x64
Posted on 09 May 2018 by Paranoid Ninja
Prologue
In the previous blogpost, we reverse engineered a binary and extracted the password from within it. This binary however contained a plaintext password. This was good to start for beginners, but you won’t really find such types of binaries in today’s world. In real life, passwords are mostly obfuscated or encrypted. Most of the times, the password isn’t even stored in the binary itself and is stored on some remote server where all the processing and verification of the serial key is done.
In this post, I have written a small C/C++ code(both compatible). Here, we won’t have any plaintext password hardcoded in the binary. As a matter of fact, the main password is itself encrypted with XOR. XOR is the most basic type of encryption which was used ages ago but is still powerful and used by a lot of attackers till date. It however isn’t used for actual encryption. It’s used more often to obfuscate the text stored. If you want to know how XOR, AND, OR works, you can take a look here.
Below is the code of our binary which you can find here. You can also directly download and run the executable itself the Git repo itself.
    #include <stdio.h>
    #include <string.h>
    void CheckPass(int *XoredPassword) {
        int PArray[10] = {38, 34, 37, 55, 55, 61, 33, 51, 32, 39};
        bool is_equal = true;
        for (int i=0; i<10; i++) {
            if (XoredPassword[i] != PArray[i]) {
                is_equal = false;
                break;
            }
        }
        if (is_equal == true) {
            printf ("[+] Correct Password");
        }
        else {
            printf ("[-] Incorrect Password");
        }
    }
    int main(int argc, char *argv[]) {
        if (argc != 2) {
            printf("Help:\n%s <10 character serial key>\n", argv[0]);
        }
        else {
            int stringLength = strlen(argv[1]);
            if ((stringLength > 10) || (stringLength < 10)) {
                printf("[-] Serial key must be of 10 characters. Please recheck your key\n");
            }
            else {
                int XoredDecimal[10] = {};
                int keyStore[10] = {85, 86, 87, 88, 89, 90, 81, 82, 83, 84};
                for (int i=0; i<10; i++) {
                    XoredDecimal[i] = ((int)(argv[1][i]))^(keyStore[i]);
                }
                CheckPass(XoredDecimal);
            }
        }
        return 0;
    }
We can start by understanding the C/C++ code first. But that would spoil the fun. Reason being that when cracking proprietary binaries, we won’t find the source code most of the time. So, let’s just run it normally and see what we get.

As you can see it prints out as incorrect password. So, let’s load this up in x64dbg and reverse engineer it. Remember that our aim is to find the password and not just modify the return value to print the correct password.
Disassembly
You can load up the binary in x64dbg by passing the argument and the absolute path of the binary in powershell or cmd like this:
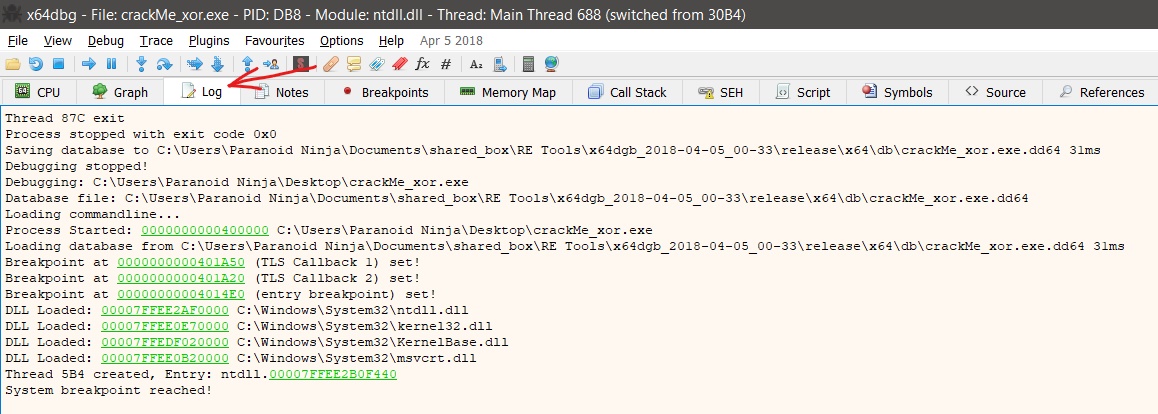
As you can see above, the ntdll.dll, kernel32.dll, KernelBase.dll and msvcrt.dll are being called here. The reason why I am informing about these DLLs is because we don’t need to touch them as for now. And if we just do stepi, it will take us through each step of the DLLs and inside them which we don’t want right now. We will only be reverse engineering the binary today. So, let’s view the String References like we did last time and find where we can setup a breakpoint for this binary.

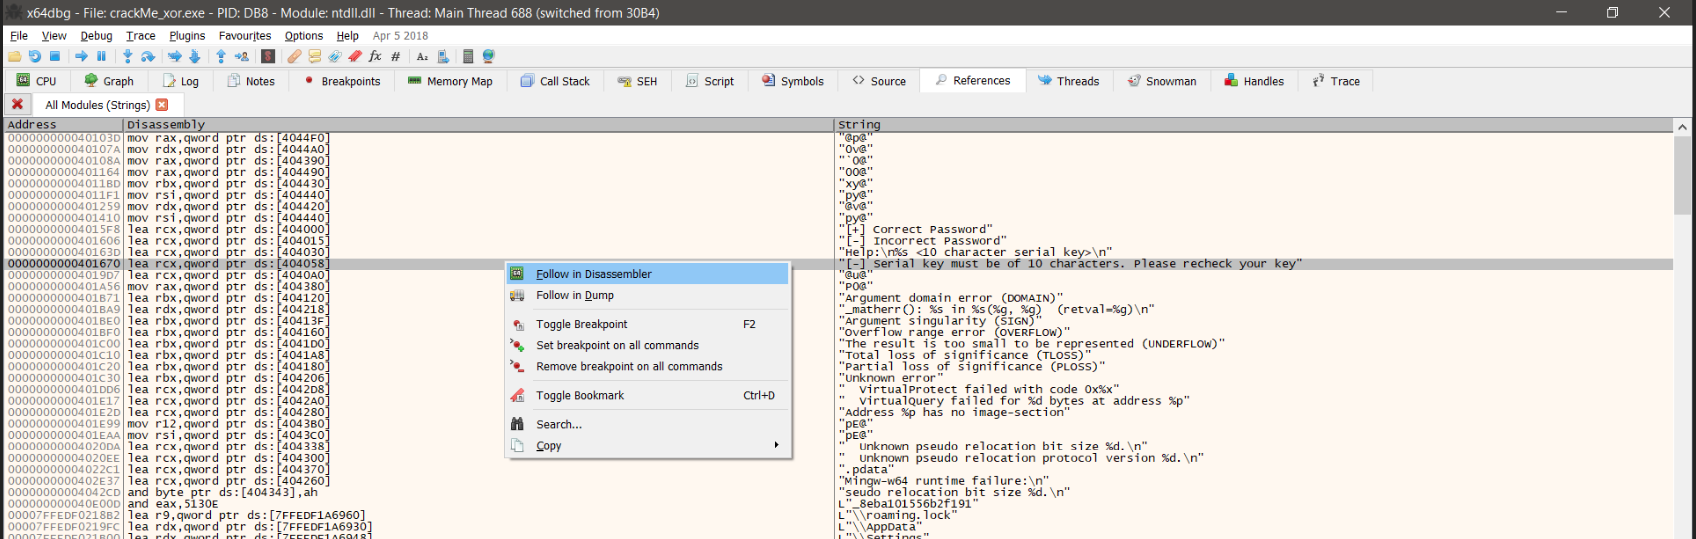
This is how the String references will look like. We will follow the text ‘Serial key must be…’ in the disassembler and view the disassembled code over there.
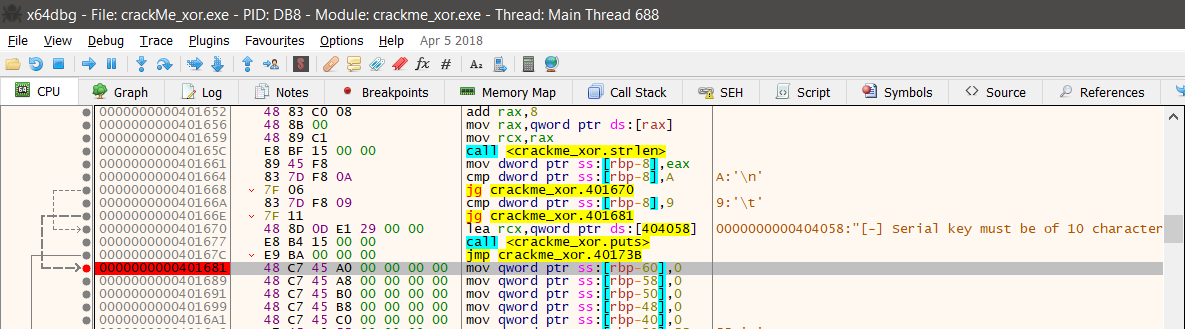
Now if you see the above image, I have setup a breakpoint at 0000000000401681. Let me tell you the reason why we selected this String Reference and setup a break point here. When we ran the above code previously we saw that it was doing a few conditional checks. For eg. The first conditional check was if we don’t enter an argument, it prints the help statement. The second check was if you enter a key less than or greater than 10, it will prompt an error stating to enter an exact 10 character key. This simply means that once we have supplied the correct argument only then it will proceed to check the password and that is why we selected this String reference.
And if you take a look at the address 0000000000401668 or address 000000000040166E they both do conditional checks and then jump to 0000000000401681. If either condition fails, it will print the Serial key error and exit the code. Now let’s run the binary prove that our hypothesis is correct.
Once you’ve run the binary, you will see that from 00000000004016A9 till 00000000004016EF, it starts loading up something into the DWORD Pointers in the various locations within the RBP register.
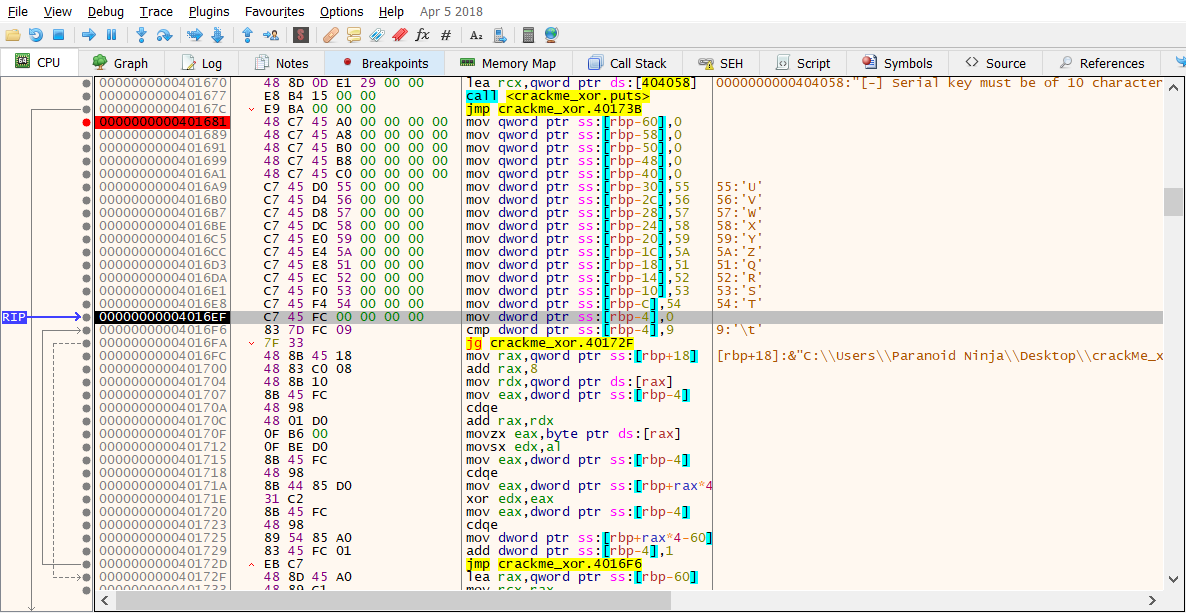
Right now we don’t have any clue what they are, so we will just write them down and store it in case we require it in the future. The 10 characters are U, V, W, X, Y, Z, Q, R, S, T. Also remember that the numbers you see to the left of these characters are HEX values of the characters itself. For eg: if you convert 55 to decimal, you get-
55 = 5(16^1) + 5(16^0) = 80 + 5 = 85
And we all know that 85 is the ascii value of the character U. Similarly, if we convert all the values to ascii, we get
| Char | U | V | W | X | Y | Z | Q | R | S | T |
| Hex | 55 | 56 | 57 | 58 | 59 | 5A | 51 | 52 | 53 | 54 |
| ASCII | 85 | 86 | 87 | 88 | 89 | 90 | 81 | 82 | 83 | 84 |
Let’s keep this aside as for now. Keep in mind that our password was also a 10 character value and this set is also of the same length. Also remember that in XOR, the value xor’d with zero, is the value itself. This is the reason why the string to be encrypted and the key value needs to be of the same length when xoring.
Going back to our code by doing a few stepi, we reach at 00000000004016FA. You can also see we have another condition here stating jg crackme_xor. 40172F. If you take a look at the RBX register, it has a number loaded as 10.
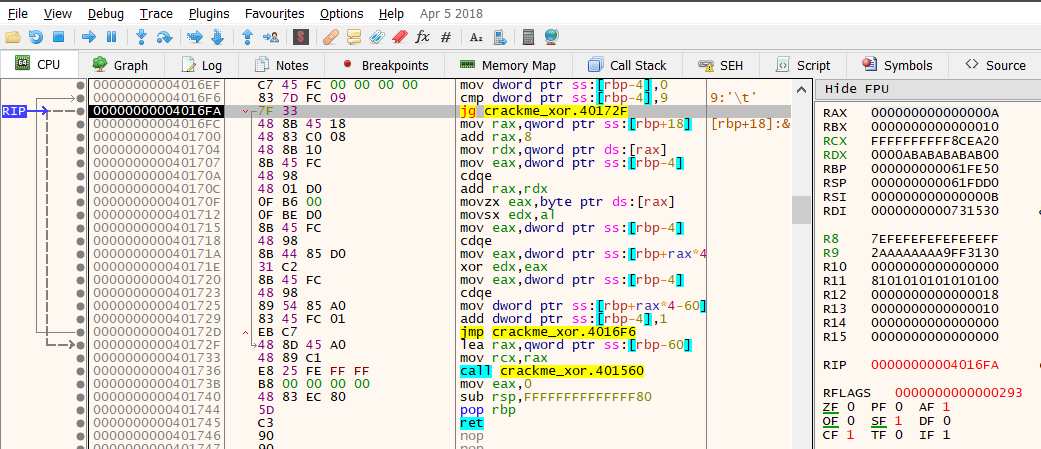
jg means jump if greater than. So our code here is simple loop which will keep repeating itself till 000000000040172D, till the value increments to 10. At 000000000040172D, you can also see it jumps back to 00000000004016F6, where it compares the value with cmp dword ptr, If it is greater than 10, it will straight away jump to 000000000040172F else will continue to repeat itself till the register receives the value 10.
Now, if you continue stepping the program with stepi, you can see that at 0000000000401704, it loads our entered password into the RAX register and then into EAX register at 000000000040170F.
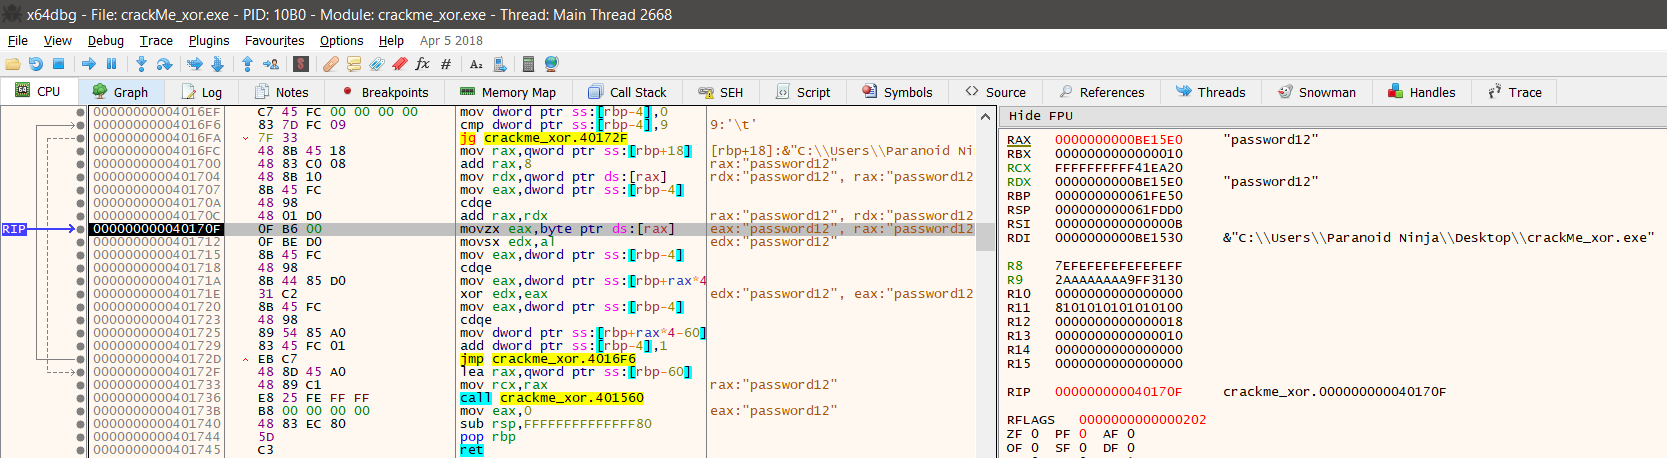
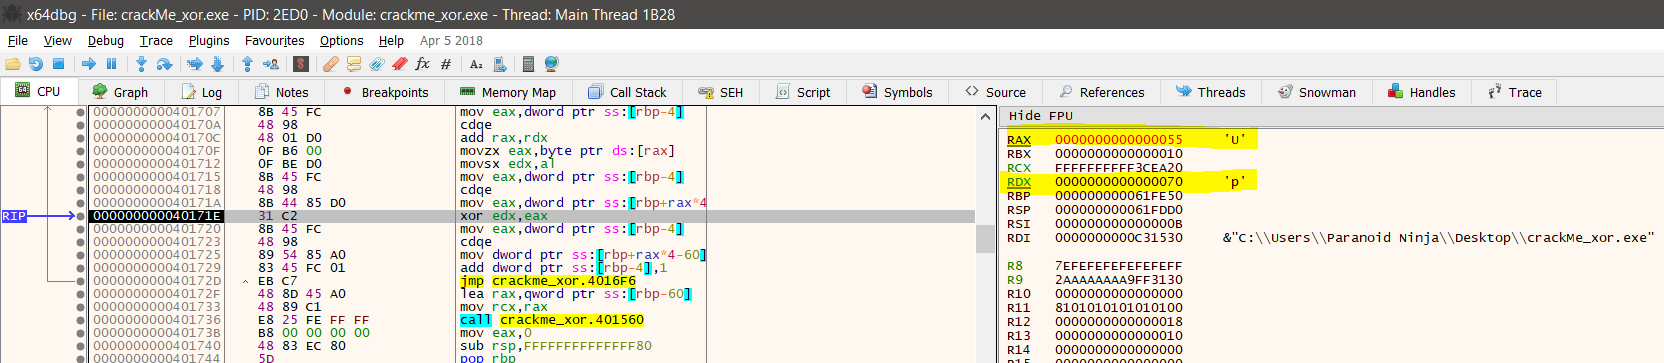
At 0000000000401712, the value at AL register i.e. ‘p’ is being moved to the EDX, register. Another value is being moved to the EAX register at 0000000000401715. And both of them are XOR’d at 000000000040171E.

Now, if you step through the instructions with stepi, you will see that the value ‘p’ is loaded in the RDX register which is nothing but the first letter of our password ‘password12’ and the another value which is loaded in the EAX register for xoring is uppercase letter ‘U’.
Now let’s run it through the entire loop step by step. Right now we are on the increment counter One. Remember that this counter will run 10 times which means 9 other values will be xor’d as well. So, let’s see what it loads up at the next loop.
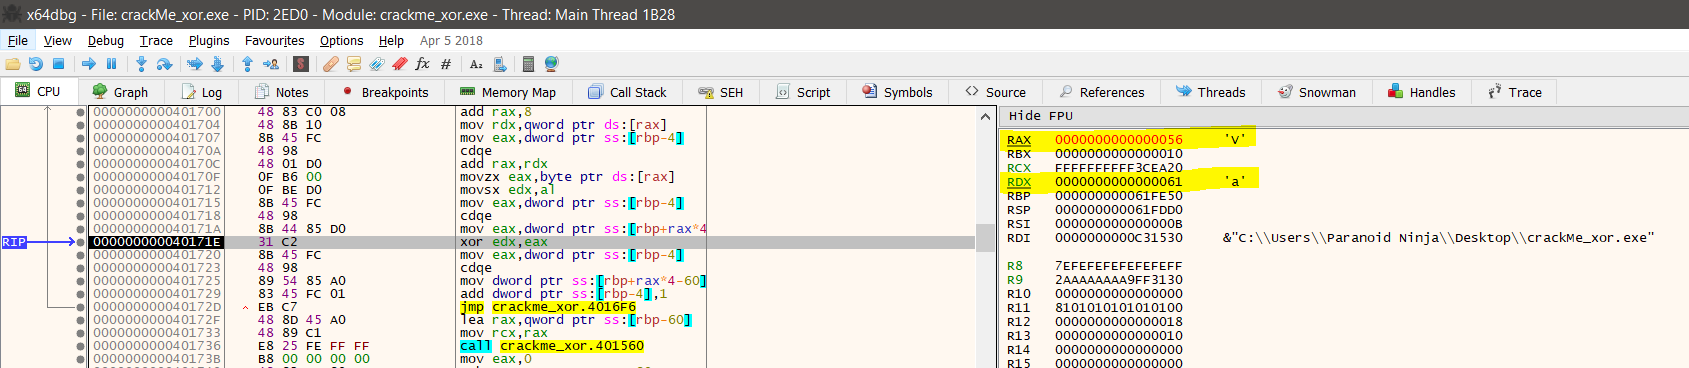
As you can see, it loaded up ‘a’ from our password ‘password12’ into RDX, and another value ‘V’ which will be xor’d with ‘a’. Similarly if you run through the entire loop, you will see that each of our letter is getting xor’d in the below manner till the increment counter reaches 10 at 00000000004016FA. So, in short these values which are getting xor’d with our password is nothing but the key which was loaded previously i.e. U, V, W, X, Y, Z, Q, R, S, T. Now, if we XOR our password with the above key, we get:


Xoring both the above Binary numbers, we get the below xor’d binary:

Remember that this is just the key and not the main password. To find out the password we need two values. For eg: if X xor Y = Z, then Y xor Z will be X. So, we will need two set of values i.e. either X and Y or Y and Z or X and Z. And right now we only have the Key set [U, V, W, X, Y, Z, Q, R, S, T], which means we still need to find the other set to find out the actual password. Let’s proceed with the disassembled code and see where it takes us next. At 0000000000401736, we can see it is calling some other function. Let’s step into that function and see what it does there.
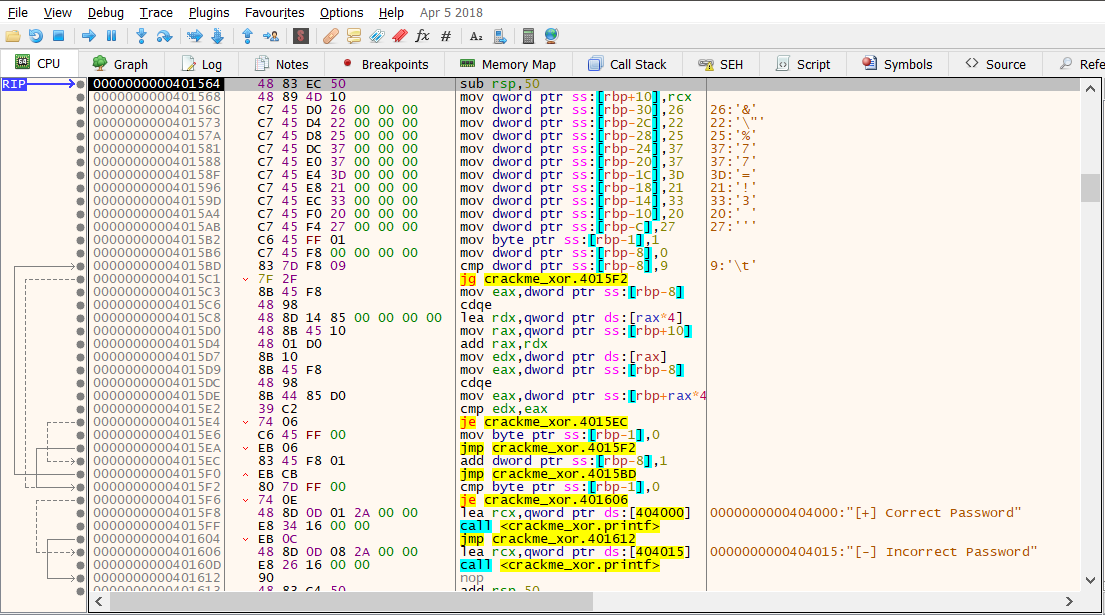
Oh, great. So we see that at 000000000040156C, another set of characters are getting loaded into the registers. Let’s convert each hex value to decimal and what we get:

Let’s keep this aside for now, and proceed with the pending code. At 00000000004015BD, again cmp is used to compare the value and the RBX register holds the value 10. Then we have jg again which will jump to 00000000004015F2, if the counter becomes greater than 10. Now, if we just step into the address 00000000004015E2, it is comparing the value ‘&’ and the value ‘%’. We know that ‘&’ is nothing but the value we found above with the Hex code 26 and the ASCII value 38. But what is the value ‘%’ and why is it being compared to the ‘&’?
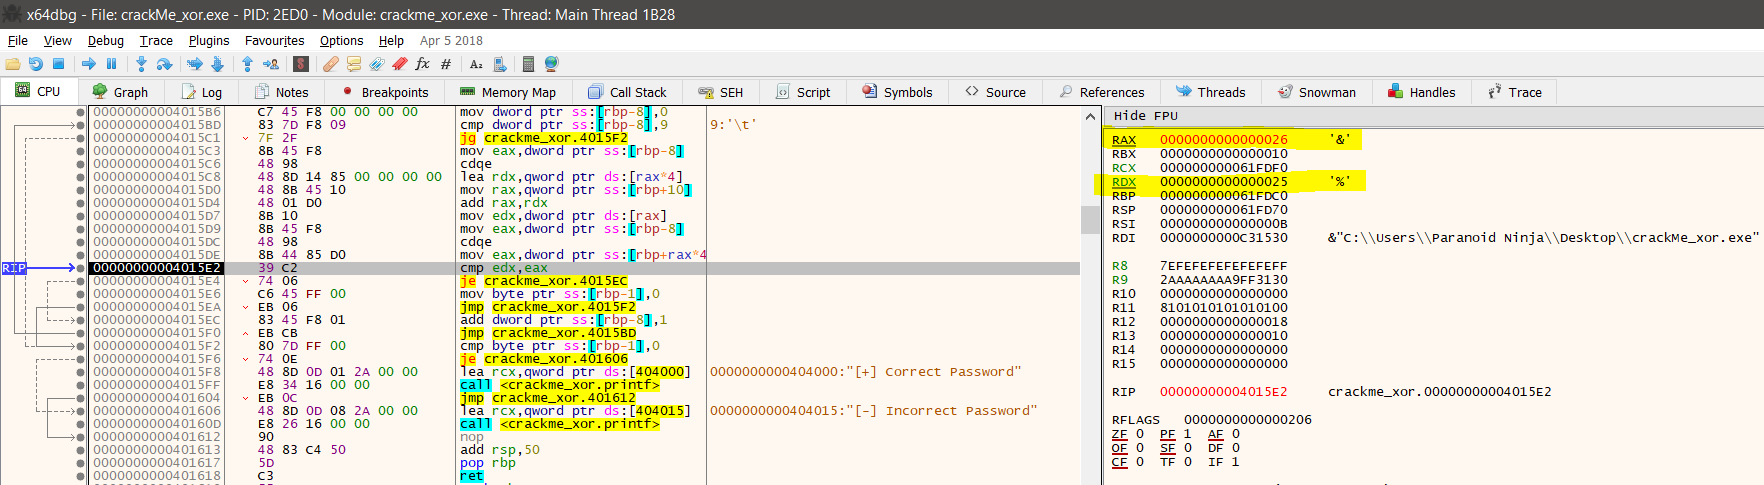
If you convert % to ASCII, we get 37 as its decimal counterpart. And if you scroll back up, remember that ‘%’ is the xor’d value of ‘p’ and ‘U’. Now, if we continue the loop through this disassembled code, you will see that it doesn’t proceed to compare the next value. The reason being the code at address 00000000004015E2. Here EDX (%) is compared to EAX (&), and if they are unequal, a Carry flag (CF) is set to 1. The next instruction at 00000000004015E4, is checking whether the previous instruction has value zero. je, will jump if value is zero, but it won’t jump and will proceed to the next step since we have set the value is One since both are not equal.
UPDATE [29-5-2018]: je which is jump if equal to, will jump to the specified instruction if the zero flag is set. In our case this flag is not set.
At 00000000004015F6, it will then proceed to print the ‘Incorrect Password’ and exit the loop and the program.
So, we still haven’t recovered the password to our program yet. BUT, we have what we need. We have the key [U, V, W, X, Y, Z, Q, R, S, T] and the value which is being compared i.e. [26, 22, 25, 37, 37, 3D, 21, 33, 20, 27]. Remember, that the value which is being compared isn’t the password. It is the xor’d value of the actual password and the key. So we need to xor the compared value with the key again to get the actual password.
Now, let’s convert both to decimal and XOR them and let’s see what we get:
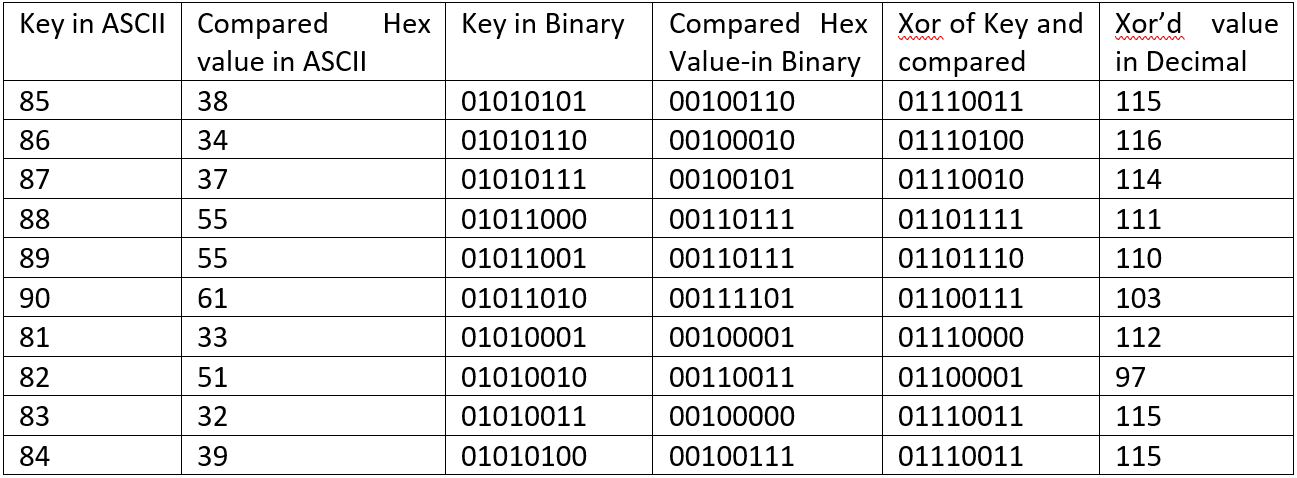
And now, if we convert the final xor’d value of decimal to text,we get:

Epilogue
So, basically the password should be strongpass, if our hypothesis is correct. Let’s insert that in our binary and check if we are correct:
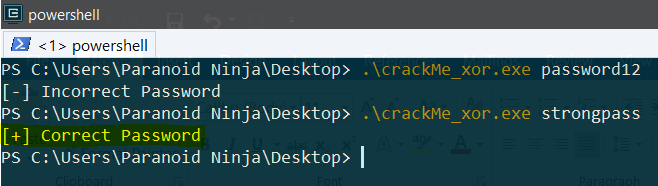
And yes, we are. This post was a bit complicated one, but however in the next blog, we will be taking a look at building cracked binaries out of applications which doesn’t store any passwords in memory and only communicate passwords over the network.
Tagged with: reverse-engineering blogs